The Energy Force Budget Processing programs are designed to give the ability to generate budget payments for active customer accounts based on 3 different options:
- Average # of Degree Days by Customer Type
- By Gallons based on a history date range
- Average # of Degree Days by Price Code
Once payment amounts are analyzed and approved, automated processing takes place to apply the Budget to the customer account along with beginning and ending time frames, service and finance charge rules, and so on.
Budgets can also be applied manually to a specific customer account at any time. This document will explain each process (automated and manual) to assist with managing budget customers.
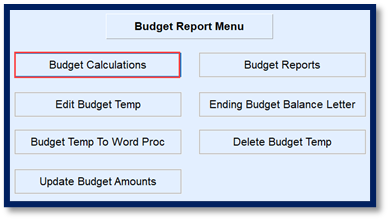
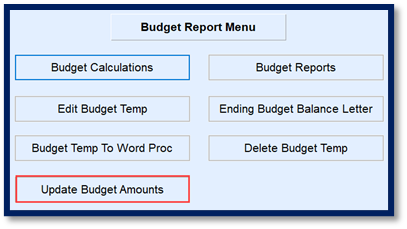
To access the Budget Processing Menu, navigate to Main Menu / Report Menu / Budget Reports.

The menu options are as follows and will be explored throughout this document:
- Budget Calculations – Auto-generate budget payment amounts.
- Edit Budget Temp – Modify generated budget payment amounts.
- Budget Temp to Word – Export a text file of budget calculations for review prior to finalization of payments.
- Budget Reports – View various reports regarding the status of budget payments.
- Ending Budget Balance Letter – These letters display the final balance of the remaining balance due or credit balance remaining.
- Delete Budget Temp – Clear the Edit Budget Temp file.
Automated Budget Calculations
The following steps need to be performed prior to executing the Budget Calculation routines:
Delete Budget Temp
When the Budget Calculations program is processed, it communicates suggested monthly payment amounts to the Edit Budget Temp module. The Edit Budget Temp module gives the ability to review, modify, and remove payments as necessary before committing a finalized payment amount to the customer accounts. The temp file should be deleted prior to processing Budget Calculations to avoid duplicate entries.

Steps to Delete Budget Temp
- Select Delete Budget Temp. The system will automatically process and remain on the Budget Report Menu.
- Select Edit Budget Temp and verify there are no previous calculations present in the file.
- Press ESC to return to the Budget Report Menu.
Budget Calculations
There are three options for processing budget payment calculations. Each time Budget Calculations are processed, a report will display to indicate the Current Budget Payment and the New Budget Payment. This information also writes to the Edit Budget Temp program.

- Average # of Degree Days by Customer Type – This allows for entry of annual degree days and for a specific customer type.
- By Gallons – This is based on number of gallons delivered to a customer account/tank based on a history date range.
- Average # of Degree Days by Price Code – This is the Annual degree days for tanks associated to specific price codes.

Budget Calculation Type 1 – Average # of Degree Days
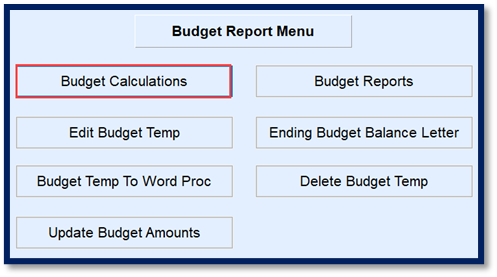
- Select Budget Calculation located on the Budget Report Menu screen.
- Select Average # of Degree Days by Cust Type.
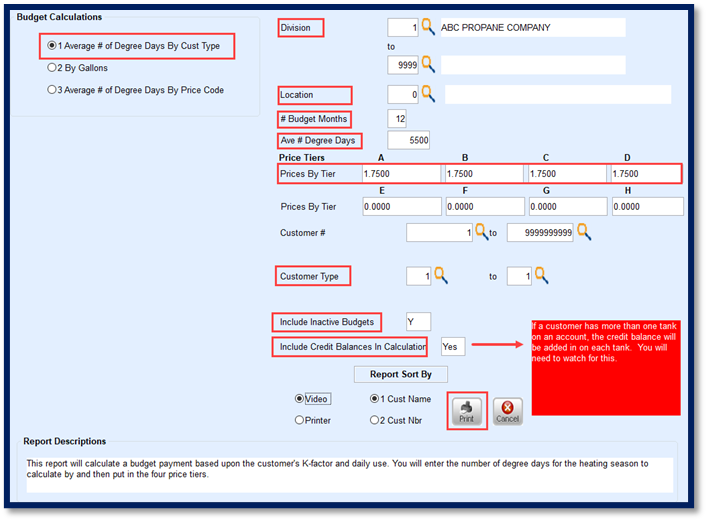
- Enter the Division for Budget Processing. Independently owned companies may choose to process one division at a time or leave the Division range open to process all.
- Enter the tank Location for processing if Location Codes are validated on the Tank Info screen. Leave as 0 for all.
- Enter the number of months the budgets will be active in the # Budget Months field. Energy Force allows for up to 15 months.
- Enter the Ave # Degree Days for the degree day regions.
- This value should typically be based on the national average for your area. However, keep in mind that degree day totals can vary from year to year based on the previous heating season.
- Example: 2020 may have been an extremely cold winter due to a polar vortex and abnormal for a standard winter in your area. It is not advisable to utilize the number of degree days that occurred during this time period. The system will base payments on the abnormally frigid temperatures and may cause credit balances at the end of the budget season.
- This value should typically be based on the national average for your area. However, keep in mind that degree day totals can vary from year to year based on the previous heating season.
- Enter the price per gallon that will be utilized for budget customers in the Prices by Tier fields. Make certain to enter a value in each Price Tier currently being utilized in Energy Force.
- Leave the defaulted value of 1 – 9999999999 for all customers in the Customer # fields. Otherwise, enter a specific customer range if desired.
- Enter the Customer Type range for processing.
- The Include Inactive Budgets setting is typically set to N so the program will only process for current budget accounts.
- If the Budget Calculation routine has never been used before, a Y can be entered in this field. The system will calculate a budget on every account based on the parameters entered. This will build the initial budget database for all customers. The Edit Budget Temp program will give the ability to remove accounts and modify payments as necessary.
- Enter Yes in the Include Credit Balances in Calculator field if Energy Force should include the customer’s current credit balance (should one exist).
Note: If the customer has more than one tank, be mindful that the same credit will apply to all tanks. The payment amount will need to be adjusted in the Edit Budget Temp program. - Select Print. The program will begin processing and display a report of customers with budget payment amounts.
- Review the report and continue to the Edit Budget Temp tab.
Budget Calculation Type 2 – By Gallons
Budget Calculation type 2 is based on gallons and a date range.
- Select Budget Calculations located on the Budget Report Menu screen.
- Choose By Gallons.
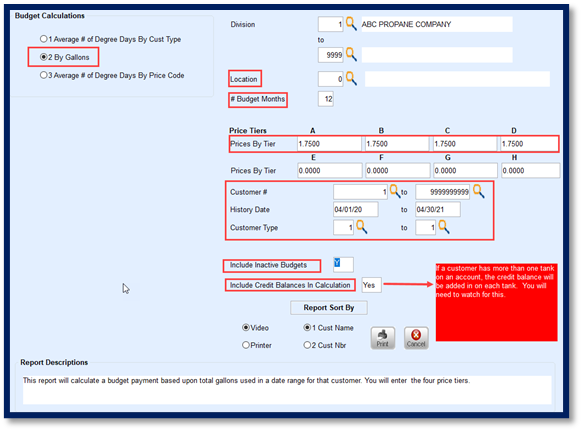
- Enter the Division for Budget Processing. Independently owned companies may choose to process one division at a time or leave the Division range open to process all.
- Enter the tank Location for processing if Location Codes are validated on the Tank Info screen. Leave as 0 for all.
- Enter the number of months the budgets will be active in the # Budget Months field. Energy Force allows for up to 15 months.
- Enter the price per gallon that will be utilized for budget customers in the Prices by Tier fields. Make certain to enter a value in each Price Tier currently being utilized in Energy Force.
- Leave the defaulted value of 1 – 9999999999 for all customers in the Customer # fields. Otherwise, enter a specific customer range if desired.
- Enter the History Date Range. When the system processes, it will review the Customer History Inquiry screen to determine the number of gallons delivered during this time period.
- The number of gallons * price will then be divided by the # Budget Months to determine budget payment amount.
- If Include Credit Balances in Calculation is set to Yes, this will also be taken into consideration for the monthly payment due.
- Enter the Customer Type range for processing. If left blank, all customer types will process.
- The Include Inactive Budgets setting is typically set to N so the program will only process for current budget accounts.
- If the Budget Calculation routine has never been used before, a Y can be entered in this field. The system will calculate a budget on every account based on the parameters entered. This will build the initial budget database for all customers. The Edit Budget Temp program will give the ability to remove accounts and modify payments as necessary.
- Enter Yes in the Include Credit Balances in Calculator field if Energy Force should include the customer’s current credit balance (should one exist).
Note: If the customer has more than one tank, be mindful that the same credit will apply to all tanks. The payment amount will need to be adjusted in the Edit Budget Temp program. - Select Print. The program will begin processing and display a report of customers with budget payment amounts.
- Review the report and continue to the Edit Budget Temp tab.
Budget Calculation Type 3 - Average # of Degree Days by Price Code
This option is essentially the same as Budget Calculation 1. However, this is based on the Price Code tied to the customer tank rather than the Customer Type code.
- Select Budget Calculation on the Budget Report Menu screen.
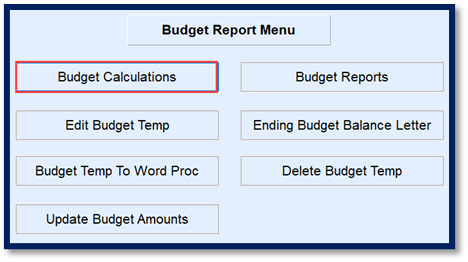
- Choose Average # of Degree Days By Price Code.
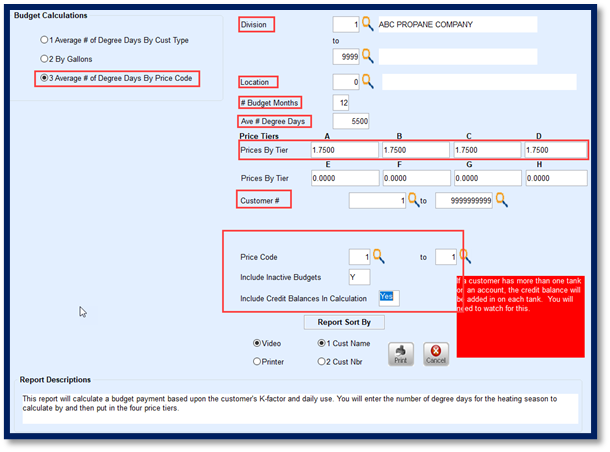
- Enter the Division for Budget Processing. Independently owned companies may choose to process one division at a time or leave the Division range open to process all.
- Enter the tank Location for processing if Location Codes are validated on the Tank Info screen. Leave as 0 for all.
- Enter the number of months the budgets will be active in the # Budget Months field. Energy Force allows for up to 15 months.
- Enter the Ave # Degree Days for the degree day regions.
- This value should typically be based on the national average for your area. However, keep in mind that degree day totals can vary from year to year based on the previous heating season.
- Example: 2020 may have been an extremely cold winter due to a polar vortex and abnormal for a standard winter in your area. It is not advisable to utilize the number of degree days that occurred during this time period. The system will base payments on the abnormally frigid temperatures and may cause credit balances at the end of the budget season.
- This value should typically be based on the national average for your area. However, keep in mind that degree day totals can vary from year to year based on the previous heating season.
- Enter the price per gallon that will be utilized for budget customers in the Prices by Tier fields. Make certain to enter a value in each Price Tier currently being utilized in Energy Force.
- Leave the defaulted value of 1 – 9999999999 for all customers in the Customer # fields. Otherwise, enter a specific customer range if desired.
- Enter the Price Code range for processing.
- Tanks with this Price Code will be the only accounts processed.
- The Include Inactive Budgets setting is typically set to N so the program will only process for current budget accounts.
- If the Budget Calculation routine has never been used before, a Y can be entered in this field. The system will calculate a budget on every account based on the parameters entered. This will build the initial budget database for all customers. The Edit Budget Temp program will give the ability to remove accounts and modify payments as necessary.
- Enter Yes in the Include Credit Balances in Calculator field if Energy Force should include the customer’s current credit balance (should one exist).
Note: If the customer has more than one tank, be mindful that the same credit will apply to all tanks. The payment amount will need to be adjusted in the Edit Budget Temp program. - Select Print. The program will begin processing and display a report of customers with budget payment amounts.
- Review the report and continue to the Edit Budget Temp tab.
Edit Budget Temp
Once budget calculations have been performed, the Edit Budget Temp program is ready for review and modification if necessary.
To preview the budget information in an Excel spreadsheet prior to updating the information within this program, see the Budget Temp to Word tab.
Edit Budget Temp Screen
- Select Edit Budget Temp on the Budget Report Menu screen.
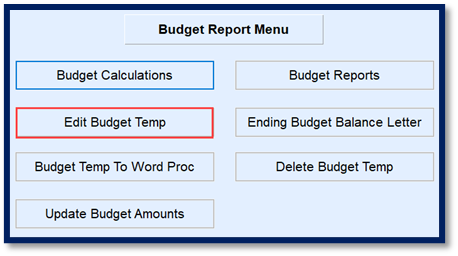
- Review the screen.
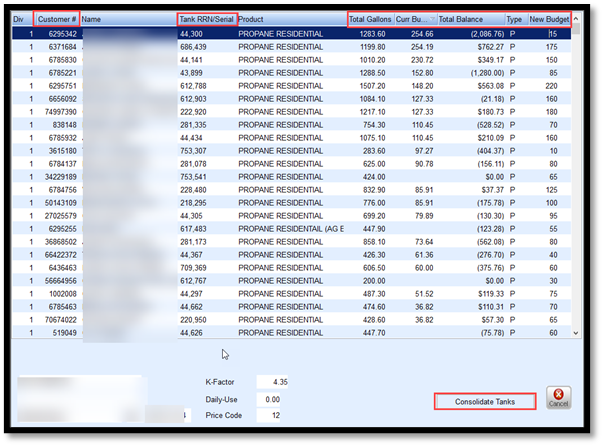
- Customer number and tank information is displayed to reference if the customer account needs reviewed.
- Total gallons for the timeframes are listed along with the current budget payment if the customer already has one.
- The customer Total Balance is also listed. Only credit balances will have an effect on the New Budget payment amount if Include Credit Balances was selected when processing budget calculations.
- The New Budget amount is listed. This amount is based on the number of Total Gallons * the price entered on the Budget Calculation screen. It is then divided by the number of months entered to determine the payments.
- All payments are rounded up in $5 increments.
- If a customer has more than one tank, the tanks are listed separately with a payment based for gallons sold or estimated for each tank. To have the payments consolidated into one payment for all tanks, select Consolidate Tanks.
- If selected, the Consolidate Tanks button modifies to display Show all Tanks.

- This button can be selected to return to the previous mode that displays all tanks.
- Press Ctrl+M and modify new Budget Amounts as necessary.
- If a budget needs removed, highlight the budget customer and press F3 and confirm to delete.
- Don’t forget! If utilizing the customer credit balance into the calculation and the customer has more than one tank with history, adjust the payment amount to reflect only one credit balance. The payment may need to be increased.
- Press Ctrl+Q to save and Esc to exit the program once all changes have been made. Budget Payments are now ready to be applied to customer accounts, also known as Update Budget Amounts.
Year End Budget Clear
This procedure needs to be performed BEFORE processing the Update Budget Amount portion. The Year End Budget clear inactivates previous budgets and resets customer AR information. See the Year End Budget Clear article for details. Once completed, proceed to Update Budget Amounts.
Budget Temp to Word
Once budget calculations have been performed, the budget temp file can be exported to an ASCII file for review. This report can be used to review the accounts and filter information prior to making changes in the Edit Budget Temp program.
- Select Budget Temp to Word on the Budget Report Menu screen.
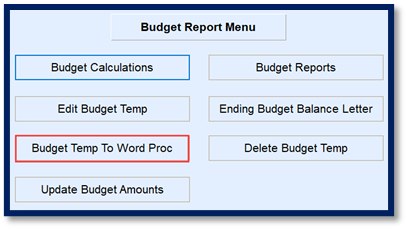
- Enter a Filename.
- Select to Include Contracts to see contract information established on the customer accounts.
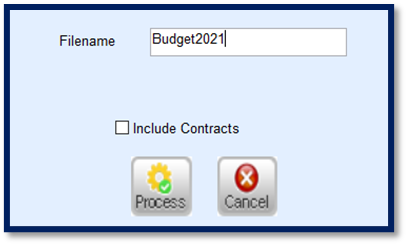
- Choose Process. The program will process and return to the Budget Report Menu screen.
- The file will be located in the \\servername\ctls93\dd85\WP folder on the server.
- Ask an IT professional for assistance retrieving this file.
- Import the file into an Excel spreadsheet.
- Open Excel.
- Select File and then choose Open.
- Navigate to the path listed in step 5 and select the Filename entered in step 2.
- Select Delimited as the Import Type.
- Select Other and enter a pipe ( | ) delimiter in the open. (Shift + backslash)
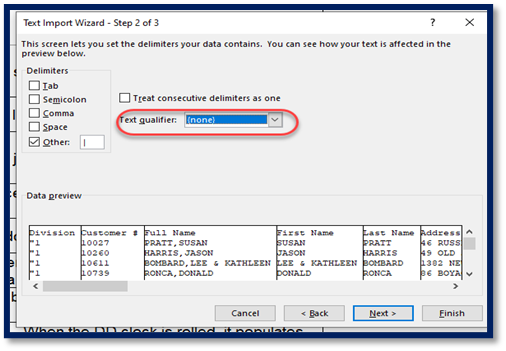
- Select Finish.
- The spreadsheet will open to display the budget calculation information.
Update Budget Amounts
The Update Budget Amounts program performs a mass update to Budget tabs located on the Customer Maintenance screen to reflect the newly calculated budget payments. The settings made in this program will automatically apply to all accounts within the Budget Temp screen, and therefore, imperative that they be accurate prior to performing this function.
- Select Update Budget Amounts on the Budget Report Menu screen.
- Enter Starting and Ending Division numbers.
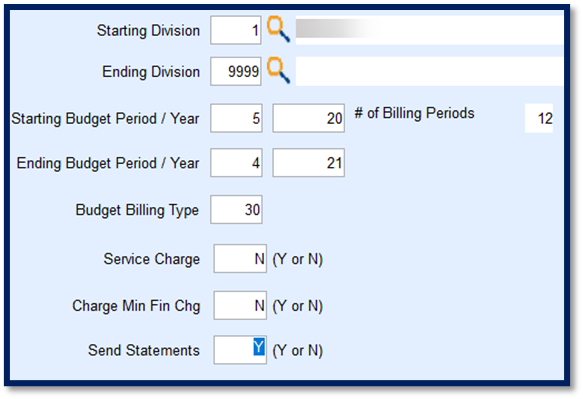
- Enter the Starting Budget Period month digit and the last two digits of the starting Year.
- Enter the Ending Budget Period month digit and the last two digits of the ending Year. The # of Billing Periods will display. Check for accuracy.
- Enter the Budget Billing Type code.
- This number is needed before accessing this program as there is no lookup feature for this field. Reference the Bill Type Maintenance screen to determine the proper code.
- Enter Y or N to apply Service Charges to customer accounts during the budget billing time period.
- This is typically set to N.
- Enter Y or N to Charge Min Fin Chg.
- This is typically set to N.
- Enter Y or N to Send Statements to this customer during the budget billing time period.
- Select Process then select the Green Checkmark to confirm updating budget customers with entered values.
- The program will run and return to the Budget Report Menu screen.
- Navigate to the Customer Maintenance screen to verify the Budget tabs updated properly and that the Service Charges, Minimum Finance Charges, and Statement fields have updated properly.
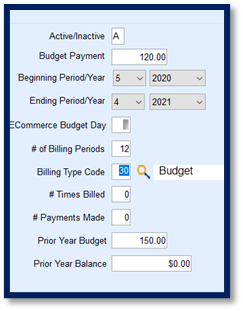
Manually Add a Budget to a Customer Account
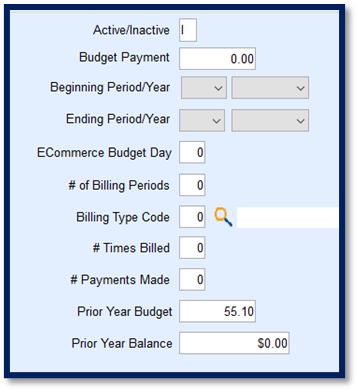
There are times a budget payment will need to be manually added to a customer account such as when an existing customer requests a budget payment after the automated processes have been completed or there is a new customer account. The following steps outline how to manually add a budget to a single customer account.
- Navigate to Main Menu / Customer Menu / Customer Maintenance.
- Highlight the customer account and select the Budget tab.
- Enter A for active.
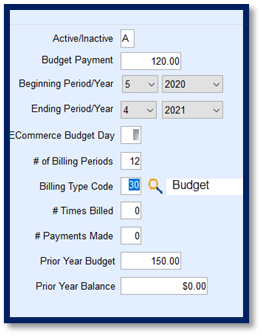
- Enter the Budget Payment amount.
- Enter the Beginning Period month and year.
- If the budget season is already active, enter the month this particular customer will begin budget payments.
- Enter the Ending Period month and year.
- If utilizing the Energy Force Ecommerce Program and the customer has requested a specific day of month for their budget payment to process, enter the day of the month in the ECommerce Budget Day field. Otherwise, proceed to the next step.
- The system will automatically calculate the # of Billing Periods based on steps 5 and 6.
- Select the Bill Type Code.
- # of Times Billed and # of Payments Made will typically be left blank upon creation.
- If the billing process has already been completed and payment received prior to the setup of this budget, enter the information accordingly.
- Prior Year Budget payment and Prior Year Balance will be left blank at this time.
- Press Ctrl+Q to save the budget to the customer account.
How Budgets are Updated Once Applied to a Customer
Number of Times Billed
This information gets updated when monthly budget statements are processed in Energy Force. The system is designed to increment the number of times billed after statements are generated when Update Statements is selected.

When processing monthly statements, All or Budget will need to be chosen in order for budgets to process.
Number of Payments Made

This value is updated when a payment is made in Energy Force using transaction code 24 for budgets. The system is designed to automatically increment the number of payments based on the dollar value entered.
For example, if the Budget payment is $100 and the customer pays $100, the system will increment by one. If the customer pays $200, the number of payments made will update by two payments.
Note: The payment must be for the minimum value, double, triple, etc. in order for the amounts to increment. If the customer paid $150, the payment will only update by one payment.
Budget Reports
There are four Budget Reports available within the Budget Report Menu.

Budget Payments Made
This report displays current budget customers and can be processed by Bill Type or by Statement Cycle Code. The report is designed to display the budget payment amount, current AR balance, number of times the customer has been billed and the number of times the customer has made a payment. It is a quick and easy way to determine if an account is past due on payments. In this example, Michael Brock is behind 2 payments.

Customers by Budget End Period
This report displays customers that have a budget ending in the month and 4-digit year that is entered in the parameter fields. Use this report to review budgets that are expiring soon or may be past due by number of payments made.

Customers with Budget Payments
A list of all customers with active budget payments and the Type of budget is displayed.

Print Budget Statements
Use this report to send a simple statement to customers indicating their budget payment is due. Keep in mind that this does not update the # of times billed. Budgets will need processed using the monthly statement program in the Month-End Menu to update the times billed.

Ending Balance Budget Letter
When budgets are nearing the end of the billing term, a budget letter can be generated for customers using this standard template.

Annual Processes
The Year End Budget Clear program needs to be processed at end of a budget period. This resets the Budgets to indicate they are inactive, moves the current payment amount to the previous payment amount, and resets the Service Charges, Minimum Finance Charges, and Send Statement settings back to their prior values before performing the Update Budget Amount Program.
Year End Budget Clear
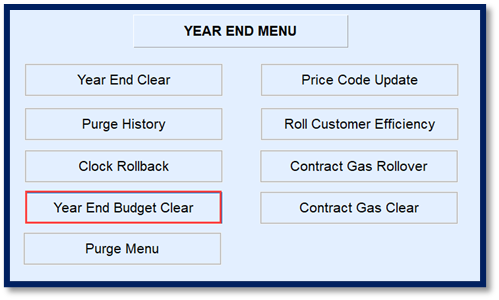
This program is located in the Year End Menu which is accessible from the main menu.
- Select Year End Budget Clear.
- Enter the Division, Ending Period month and the Ending Year.
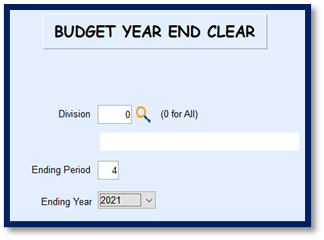
- Select Process. A screen will display to indicate the program is processing.
- When finished, the program will return to the Year End Menu. Navigate to the Customer Maintenance screen to verify the updates have taken place on budget billing accounts.
