Prior to using AFD Processing in Energy Force, specific maintenance programs located in the AFD Menu and Supervisor/Maintenance Tables menu must be created for successful processing. Once the tables are in place, they will require routine maintenance for price updates, new products, etc.


Departments
Cenex AFD designates Product IDs for the products they deliver. The Product IDs must be added to the Energy Force Department table for translation and processing purposes. Energy Force Dept IDs must be a numeric value that will be assigned to the Cenex AFD Product ID in the AFD Product XRef tables within the AFD Maintenance menu.
Examples of Product IDs from Cenex AFD are as follows:
D6100 – ROADMASTER XL (Dept # 407401 in the example below)
X2300 - #2 CLEAR (Dept # 470419 in the example below)
GSH - SUPER UNLEADED TOP TIER (Dept #270201 in the example below)

Refer to the Maintenance File Management section to set up Departments.
It is important to note that Departments will need to be added to Division 1 in addition to the Cenex AFD posting Division.
Rack Code Maintenance
Rack Codes are used to update pricing and margins simultaneously for various price codes listed in the Price maintenance file.
Example:
Multiple price codes for Roadmaster diesel fuel are listed in the price maintenance example below. When pricing or margins fluctuate for this product, it is generally for the same number of dollars/cents. Tying the same rack code to the price code allows for the Rack Utility program to update all price codes and margins at once, rather than having to update individually.


Adding a Rack Code

- From the main menu of Energy Force, navigate to Supervisor Menu / Maintenance Menu / Maintenance Tables.
- Select Rack Code. Set Mode to Edit/Create, Scope to One Division, and enter the AFD Division number in the Division field. Select Continue.
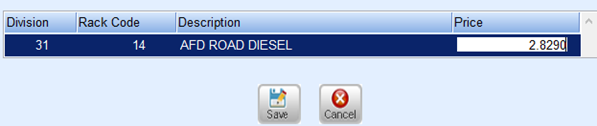
- The Rack Code screen will appear. Choose Create.
- Enter the AFD Division number and press Tab.
- Enter Rack Code number and press Tab.
- Enter a Rack Code Description and press Tab.
- Enter the current Price for the product associated to the rack (this price will fluctuate when the Update Rack Pricing program is processed) and select Save.

Price Code Maintenance
AFD Price Option 2 requires that a price code be applied to the customer tank.
For price option 2, the AFD processing program is looking at the margin associated to the price code and tier assigned to the customer tank. It does not look at the price, as that information comes directly from the Daily or Monthly billing files.
Adding a Price Code

- From the main menu of Energy Force, navigate to Supervisor Menu / Maintenance Menu / Maintenance Tables.
- Select Price. Set Mode to Edit/Create, Scope to All Divisions, and enter the AFD Division number in the Division field. Select Continue.
- The Price Code screen will appear. Select Create. Move through the fields by pressing Tab on the keyboard.

- Enter the AFD in the Division column. All pricing must be set up in Division 1 and also in the AFD processing Division.
- Enter the Price Code.
- Enter a Description.
- The Price Type will remain as zero..
- Enter Yes for Avgd Price Y/N if using Price Option 1 and the Price Code is associated to monthly monitored billing. Otherwise, leave as No.
- Enter the Rack Code for the associated product.
- In A Tier, enter the price per gallon based on Starting and Ending Gallons ranges.
- In the above example, the price per gallon is 4.129 for 150 to 499 gallons.
- Enter Starting Gallons and Ending Gallons. Press Tab until the focus is in the Margin column. Enter the margin per gallon.
- Continue to enter prices and margins for each tier and gallon range.
- To add another price code, press F4 to insert a new line or press the Down Arrow key. Repeat steps 3 through 12 for each price code and select Save when finished.
- Exit the Price Maintenance screen and select Price Maintenance.
- Set Mode to Copy and enter the AFD Division number in the Division From field. Enter Division 1 in the To Min and To Max fields.
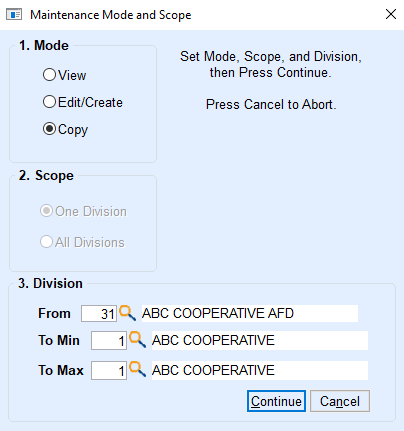
- Select Continue. This will copy all of the newly created price codes in the AFD division to Division 1.


Price Code Change History
When prices/margins are modified, they are stored in the Price Code Change History program indicating the Code, Tier, Date, Time, Price adjustment, and the User who made the adjustment. AFD Processing references this file to determine monthly average and daily billing prices.


Price Option 2 Update Margins
A utility program exists to allow pricing and margins to be updated by the rack codes set up previously in this manual. Prior to using this program, it is necessary to know the amount to increase/decrease for the current price or margin. For example, if the current price is $3.149 and is going to decrease to $3.129, establish that it is a $0.02 decrease. If the current margin is $0.57 and needs to increase to $0.60, establish that it is a $0.03 increase.
- Navigate to Main Menu / Supervisor / Processes / Utility Menu / Update Margins. Press Tab to move to the next field.
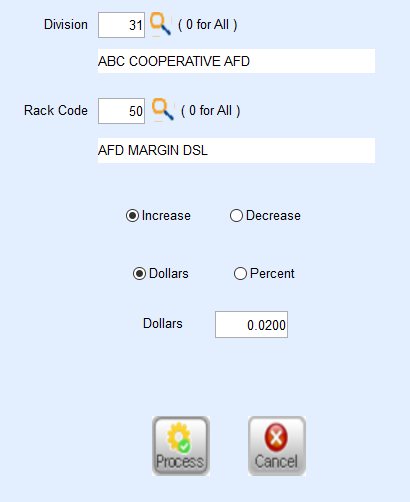
- Enter AFD Division.
- Press F5, select the Browse icon, or type in the Rack Code.
- Select to Increase or Decrease pricing.
- Choose to increase or decrease the margin by a Dollar or Percent amount.
- This rate is generally updated by dollars.
- Enter the increased or decreased amount in the Dollars field.
- Select Process. This will update the price file margins tied to this rack code.

AFD Product XRef Daily & Monthly
The AFD Product XRef Daily file is designed to translate AFD Product IDs to Energy Force Department IDs.
For example:
D6100 – ROADMASTER XL (Dept # 407401 in the Energy Force Department table)
X2300 - #2 CLEAR (Dept # 470419 in the Energy Force Department table)
GSH - SUPER UNLEADED TOP TIER (Dept #270201 in the Energy Force Department table)
Fuel Type, State, AFD Product IDs, and Energy Force Department information must exist in this table so that Energy Force knows how to interpret the incoming products from Cenex AFD and the proper taxing to apply based on the State.
Create XRef Daily & Monthly Files
AFD Product XRef Daily:
- From the main menu, select Posting Menu / AFD Menu.
- Select AFD Product XRef Daily or AFD Product XRef Monthly.
- If both types of files are processed, information will need to be added to each menu option.
- Press Ctrl+C to create.
- Enter Fuel Type (Tank Type) and press Tab to move to the next field.
- Enter the State that applies to the product (delivery site).
- Enter the Cenex AFD Product ID.
- Enter the AFD Div number.
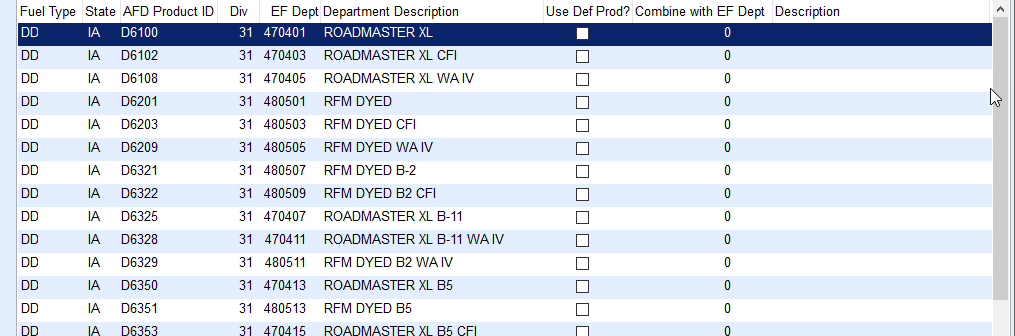
- Press F5 to select the Energy Force Department code that cross references the Cenex AFD Product ID. This will be the product that is billed to the customer in Energy Force unless Use Def Prod or Combine with EF Dept is selected (see steps 9 & 10).
- If the delivered product from Cenex AFD should be overwritten by the defaulted product associate to the customer tank, select the Use Def Prod? checkbox.
- The system will look at the tank product reference file and use the selected default product code that is tied to the customer tank.
- It will also use the price code associated with the default product in the tank product reference file.
- Combine with EF Dept
- If two products are delivered to the same tank and site ID on the same day with this option selected, the system will invoice the customer based on one product code (Ex: Heating Oil).
- Gallons will be combined and will bill to the EF Dept Description in this field and will appear as one item in the sales journal.
- Repeat steps 4 - 10 for each cross-reference item. The items must exist for each State that is delivered to by Cenex AFD.
- Press Ctrl+Q to save.

AFD Trip Charges
If the Cenex AFD Daily file applies a trip fee for delivered gallons (minimum gallon delivery), the fee will only apply towards the tank if the AFD Trip Charges maintenance table has been established. The table translates the fee to the appropriate Department code and can bill what is defaulted in the Cenex AFD file or apply a rate established based on gallons in this table. If the gallons delivered are not present in this table, the trip fee will not apply.
Adding A Trip Charge
- From the main menu, select Posting Menu / AFD Menu. Select AFD Trip Charges.

- Press Ctrl+C to create a new entry line.
- Enter the AFD Posting Division and press Tab to move to the next field.
- Press F5 and select the Energy Force department. This will auto-populate the Description field.
- Enter Gallons from and Gallons To.
- Enter the Trip Charge amount in dollars for the specified gallon range.
- If ever there is a time to ignore the rate applied by gallons in this table, select the Default Trip Charge? checkbox and the system will auto-apply the rate listed in the Cenex AFD file.

AFD Adders Maintenance Tables (Price Option 2 Only)
If processing AFD Monthly and Daily files using Price Option 2, AFD Maintenance tables will need to be created for AFD Adder Types and AFD Adders. When AFD files are imported into Energy Force, the processing program cross references the price code associated to the customer tank and determines whether additional fees should apply based on price codes applied in AFD Adders.
Create Adder Types
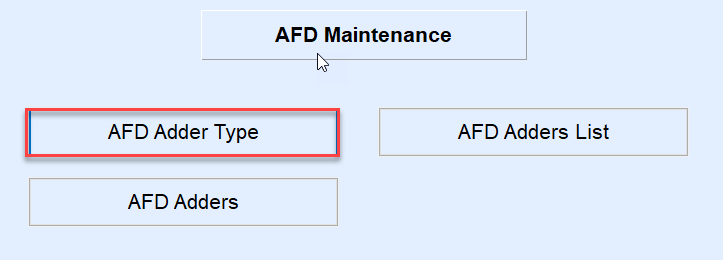
- From the main menu of Energy Force, navigate to Posting Menu / AFD Menu / AFD Maintenance and select AFD Adder Type.
- If this is the first time entering adders, the program will be in Create mode. If the program is not in Create mode, press Ctrl+C on the keyboard.
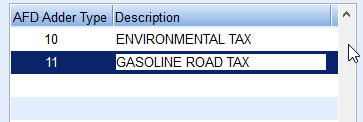
- Enter an AFD Adder Type code and press Tab.
- Enter a Description and press the Down Arrow button.
- Repeat steps 3 & 4 for each Adder Type. Press Ctrl+Q to save.


Create AFD Adders
- From the main menu of Energy Force, navigate to Posting Menu / AFD Menu / AFD Maintenance. Select AFD Adders.

- If this is the first-time entering adders, the program will be in Create mode. If the program is not in Create mode, press Ctrl+C on the keyboard.
- Press F5, select the Browse button, or key in the AFD Division number.
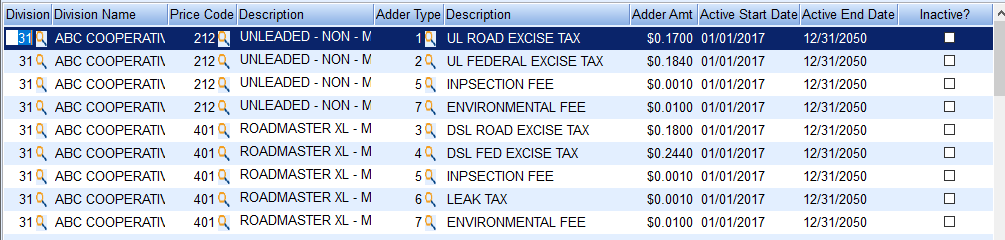
- Select a Price Code to associate an Adder fee and press Tab to move to the next field.
- Any time this price code is used, it will auto-apply the associated Adder Type.
- Select an Adder Type (Environmental fee, excise tax, etc).
- Enter the Adder Amt for the fee. This amount will be multiplied by gallons delivered.
- Enter an Active Start Date for the fee.
- The system will accept a future date. The delivery fee will not apply until deliveries are equal to this date.
- Enter an Active End Date for the fee.
- The ending date will automatically expire the fee and will no longer apply to any delivery that exceeds the date.
- If a fee becomes inactive prior to the Active End Date, select the Inactive? checkbox and the fee will no longer apply to any delivery regardless of the Active End Date.
- Use the Down Arrow on the keyboard to enter another fee and repeat steps 3 through 8 for each fee. Press Ctrl+Q when finished.


Tank Maintenance
Energy Force requires AFD tanks to be set up on the Tank Information screen with Price Codes, Tiers, and Departments. The AFD Product to Tank Product Ref option located in the Utility Menu, allows the setup of a standard tank product reference scheme to apply to tanks based on a tank type (Clear, Dyed, Gas) and gives the ability to establish a default Product, Price Code, and Tier to the product groups.

AFD Product to Tank Product Ref Setup
- Go to Main Menu / Supervisor / Processes / Utility Menu.
- Select AFD Product to Tank Product Ref.
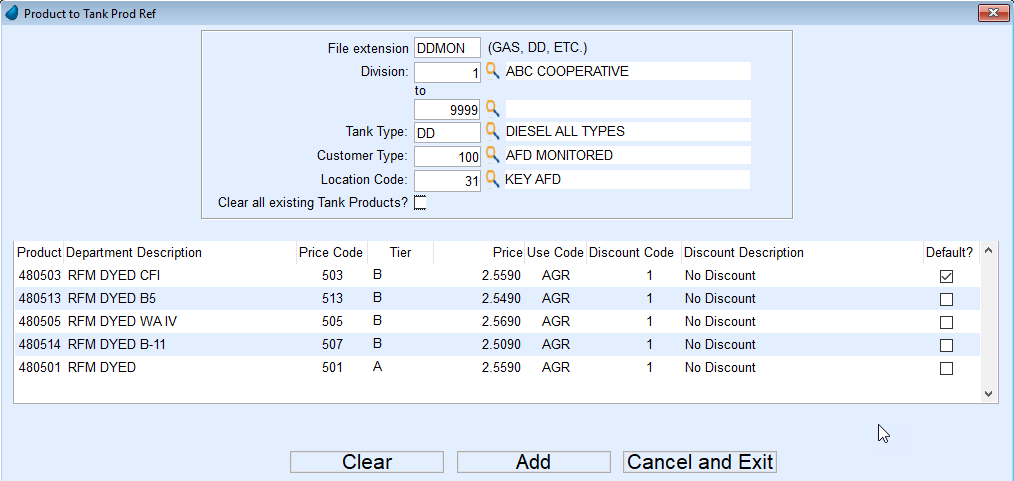
- Enter File extension and press Tab to move to the next field.
- File extension allows the setup of a profile of products to add to customer tanks based on the criteria selected. In this example, a file extension will be created called DDMON (Dyed Diesel, Monitored). This file extension will be used to update all Dyed Diesel tanks with products specific for AFD processing.
- To update this extension in the future, enter the same File Extension name. The product will automatically populate, leaving only the Tank Type, Customer Type, and Location Code to be entered.
- Enter the Customer Division number (Cooperatives – Div 1).
- Enter the ending Division number.
- Enter the Tank Type code. If unsure of the code, press F5 or select the Browse icon to display a list.
- Enter the Customer Type code.
- Enter the Location Code. This will be the AFD Division.
- Select the Clear all Existing Tank Products? checkbox to clear all existing products currently in the tank product reference table. If choosing to leave the products currently in the tank product reference, leave this field unchecked.
- If adding a new product reference table for AFD, it is recommended to check this option to remove any products that may already be associated to the tanks.
- If adding a product to an already established product reference, leave this field unchecked.
- Select in the Product field and press F5 or type in the Product code.
- Press F5 or manually key in the Price Code.
- Enter the pricing Tier. This will auto populate the Price field.
- Enter the Use Code if applicable.
- Enter the Discount Code.
- If the product entered is the default product, mark the Default? checkbox.
- To enter another product, press F4 or the Down Arrow key and repeat steps 10 through 15.
- If for some reason all items need cleared to re-enter information, press the Clear button located at the bottom of the screen.
- Select Add when the product reference profile has been completed.
- A message will appear stating Add has finished Running once completed. The Tank Info screen should now reflect the products added using this feature. Verify setup is correct.

It is important to note when adding Energy Force tank RRN codes to the Cenex AFD program, only utilize the numeric value for the Tank RRN number in Energy Force. Do not type RRN in front of the number.