Tank Groups allow groups of tanks to be defined which will be delivered as one tank should certain tanks in the group be selected for scheduling.
Rules and Considerations
- All tanks in a Tank Group must be within the same Division and Route, but not limited to a single customer.
- A tank can only be a member of a single Tank Group.
- Tank Groups, where the total gallons required exceed the truck’s capacity, will be ignored by the Optimizer. Any critical tanks from that group will still be viable candidates to be scheduled independent of the Tank Group.
- When building a Tank Group, the Optimizer does not route between all tanks but instead creates a composite tank, taking on the aspects of the most critical tank such as delivery type and GPS location. The capacity and delivery requirements of this composite tank are the sum of all its member tanks.
- Tank Groups created with tanks more than 1 mile apart will severely impact the Optimizer’s efficiency.
- At least 1 tank in the Tank Group must be in the Optimizer tank set and be considered for scheduling to trigger the formation of the Tank Group.
Note: Tank Groups are supported in Summer Fill mode and during Exclusion Periods.
OptimizerPlus+ Tank Set – Tanks exported by Energy Force and identified by OptimizerPlus+ as viable scheduling candidates based on a multitude of parameters and factors.
Viewing the Tank Group Tab
Navigate to Supervisor Menu / Maintenance Menu / Optimizer Maintenance / Optimizer+ Calendar Tool and select the Tank Groups tab.

- Customers – A list of customers taken from Energy Force. Only those customers with active propane tanks are listed.
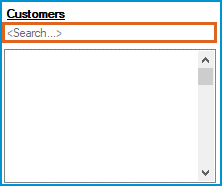 This list is searchable by using the Search box above it. Type a customer number or portion of the customer’s name then Tab to the list to repopulate it with anything matching the search phrase.
 - Available Tanks – Active propane tanks for the selected customer with a Total Tank Capacity greater than 0.
- Groups – List of currently defined Tank Groups.
- Member Tanks – Tanks that are members of the selected Tank Group.
- Group Information – Displays various information about the selected Tank Group.
- Group Name – Descriptive name of the Tank Group; can be modified.
- Tank Count – Total # of tanks that are members of the selected Tank Group.
- Estimated Total Capacity – Estimated sum of the capacity required to deliver to all tanks in the selected group. Defined by adding 80% of each tank’s capacity.
- Available Capacity – Value is the result of subtracting the Estimated Total Capacity from the truck’s Total Capacity. If this value goes below 0 then it is displayed in red.
- Division – The division of the tanks in the group set when first tank is added.
- Route – The route of the tanks in the group, set with the first tank is added.
- Farthest Distance – Distance in miles between the 2 tanks of the selected Tank Group that are farthest apart. This value displays red when it exceeds 1 mile.
- Tank Information – Displays information about any 1 tank currently selected in the Available Tanks or Member Tanks lists.
- Tank RRN – Energy Force Tank RRN of selected tank.
- Division – Division of selected tank.
- Route – Route of selected tank.
- Capacity – Total Tank Capacity of the selected tank (0 capacity tanks will not export to the OptimizerPlus+).
- Customer – Name of customer tied to the tank.
- Delivery Type – Numerical delivery type of selected tank.
- Member Of –The name of the group the tank belongs, otherwise displays a dash.
- Distance to Farthest Tank – When a group is selected, the distance in miles from the selected tank to the farthest tank in the selected group. The tank does not need to be a member to show distance. If distance is greater than 1 mile, value will display red.
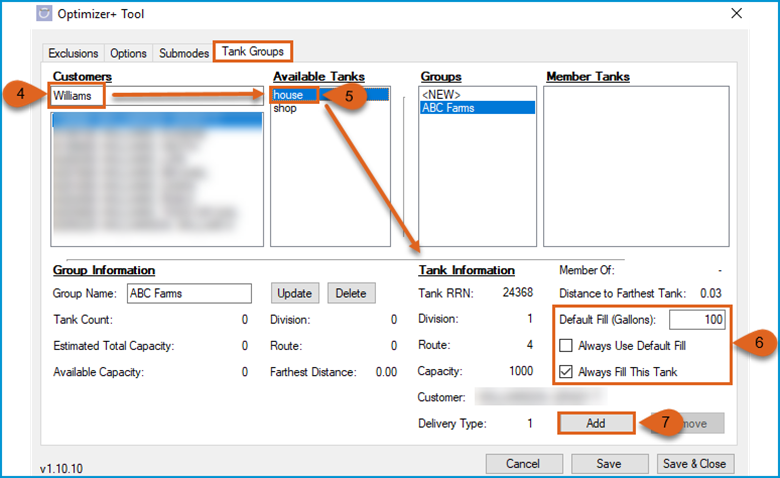
- Default Fill (Gallons) – If this tank does not exist in OptimizerPlus+’s tank set and is marked as Always Fill This Tank, then the delivery amount specified here will be used for this tank when OptimizerPlus+ is calculating the tank group delivery size. This value cannot be 0.
- Always Use Default Fill – When checked, the default fill value in above item will always be used and will override OptimizerPlus+’s estimated amount to fill an auto schedule or entered delivery amount for call ins specified in the Energy Force data export.
- Always Fill This Tank – Checked by default, OptimizerPlus+ will always include the tank for delivery even if it doesn’t exist in the OptimizerPlus+’s tank set. If nonexistent in the tank set, OptimizerPlus+ will use the Default Fill Gallons as the gallons to deliver. If box is unchecked, the tank will only be included in the schedule if it requires delivery defined by other parameters.
- Example:
- Add/Remove Buttons – Add button adds the selected tank to a group or updates the tanks settings or Remove button removes the selected tank from its assigned group.
 This list is searchable by using the Search box above it. Type a customer number or portion of the customer’s name then Tab to the list to repopulate it with anything matching the search phrase.
Creating a Tank Group
Navigate to Supervisor Menu / Maintenance Menu / Optimizer Maintenance / Optimizer+ Calendar Tool and select the Tank Groups tab.
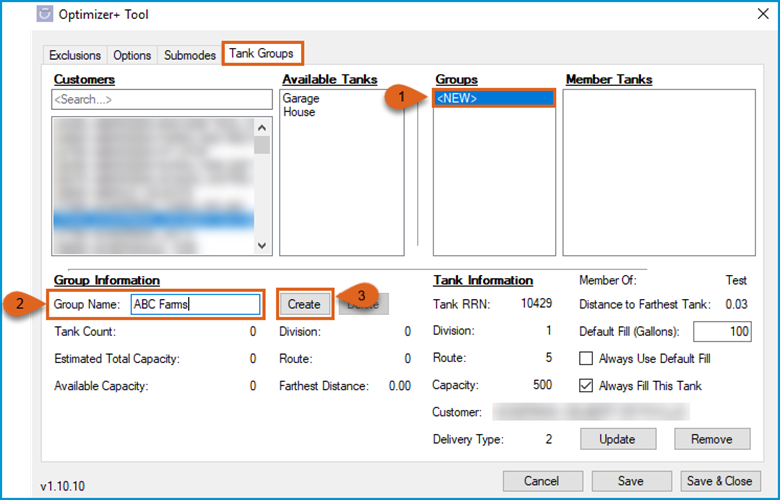
- Select the <NEW> entry from the Groups section.
- In the Group Information section, type a descriptive name for the group.
- Click Create.
- Search the Customers search box for the first customer member of the Tank Group.
- Select an Available Tank (if the tank already exists in another Tank Group, it cannot be added; the group it is a member of will be displayed in the Member Of field).
- Edit the fill details for tank.
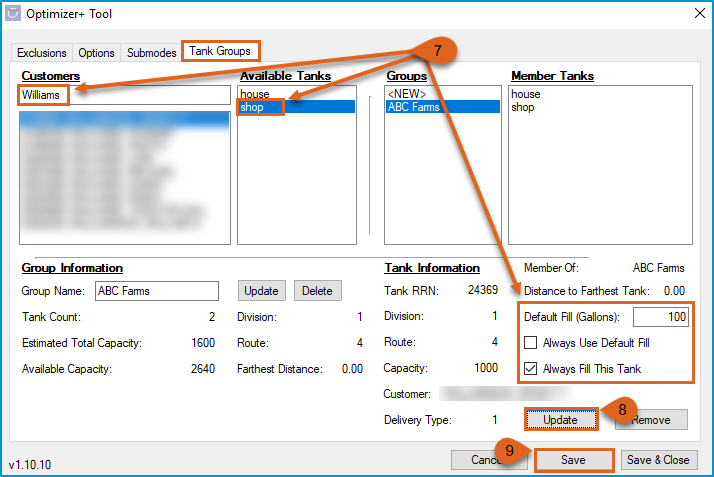
- Continue to add tanks, searching additional customers if necessary, and update fill details appropriately.
- Click Update after each tank is added to update the Tank Group.
- Click Save or Save & Close.


Editing a Tank Group
Navigate to Supervisor Menu / Maintenance Menu / Optimizer Maintenance / Optimizer+ Calendar Tool and select the Tank Groups tab.
Edit Tank Group Description/Name
- Select the Tank Group from the Groups list to edit.
- The Group Information section will update with the current details of the group selected.
- To change the name of the group, type in a new description.
- Click Update.

Edit Tank Fill Details in Existing Tank Group
- Select the Tank Group from the Groups List to edit. The Group Information section will update with the current details of the group selected.
- Select the Member Tank to view the Tank Information.
- Update the Fill Details by:
- Entering a set Default Fill (Gallons) amount.
- Option to Always Use Default Fill amount.
- Option to Always Fill This Tank.
- Once edits are complete, click Update.
- Click Save or Save & Close.

Add a Tank in Existing Tank Group
- Select the Tank Group from the Groups List to edit. The Group Information section will update with the current details of the group selected.
- Search the Customers search box for the Customer with the tank to add.
- Select the tank from the Available Tanks list.
- Edit the fill details for selected tank.
- Click Add.
- Click Save or Save & Close.

Remove a Tank in Existing Tank Group
- Select the Tank Group from the Groups List to edit. The Group Information section will update with the current details of the group selected.
- Select the Member Tank to remove.
- Click Remove.
- Click Save or Save & Close.

Deleting a Tank Group
Navigate to Supervisor Menu / Maintenance Menu / Optimizer Maintenance / Optimizer+ Calendar Tool and select the Tank Groups tab.
- Select the Tank Group from the Groups List to delete. The Group Information section will update with the current details of the group selected.
- Click the Delete button in the Group Information section.
- Click Save or Save & Close.

WARNING: Users assume all risks associated with modifying the behavior of the OptimizerPlus+ from its default or recommended settings.