Filter View
Energy Force has a feature that filters customers to specific Locations or Divisions. Filter View works with the following:
- Customer Maintenance
- Call Ins
- Journals – Includes Sales Journals, Void Journals, Payment Journals, Meter Read Entry Journals, and Meter Sales Journals
- Ticklers
A system setting is automatically generated and set to N at Supervisor Menu / Maintenance Menu / Division Maintenance / System Settings. Modify this setting to Yes to turn on the filtering option.

If logged into Energy Force when filtering is turned on, exit and login again to use the filtering option. After re-opening, the status label at the bottom of the screen (to the left of the username) with a default label of Filter: N/A should display.

Filter View Setup
The Filter system setting also enables the Filtered View Menu at Main Menu / Supervisor Menu / Setup Options. This menu contains the Group Setup, Import Group Setup and Default Filter Setup. Prior to setting a filter value, navigate to Main Menu / Customer Menu / Customer Maintenance to verify the customer list contains all customers.
Group Setup
Filtering can be setup on 3 Levels: Upper Level, Mid Level and Base Level. Base Level will be pre-populated based on the Division Maintenance table.
Filters can be set by all three levels or a combination of them. The Upper Level and Mid Level are not required to be setup if only Base Level filtering is wanted and Upper Level is not required if only 2 levels are needed.

- To Add a new Mid or Upper Level filter, select Add underneath the level being added.
- Enter the new Level name.
- Select the lower levels that need to be tied to this new level.
- Select Save Group.

If the group added is the first one for that Level, in order for it to show, close the Filtered View Setup and reopen. There has to be at least one Mid Level created in order to add an Upper Level.
Example: A Mid Level is being added called New Mid Level with Base Levels (Locations or Divisions) 2 and 4 selected. When Mid and Upper Levels are used, the corresponding lower levels that were selected will be brought to the top of the list and will have a checkmark in the Included column.
Changes can be made to levels by selecting Edit. The name and/or the levels tied to it can be changed or the level setup can be deleted.
Filter Levels by default are labeled as Upper Level, Mid Level and Base Level. These filter labels can be modified at Supervisor Menu / Set Up Options / Filtered View Menu / Group Setup. Select the edit icon to the right of the description and enter a new Description and select Update.
The label can be up to 30 characters long. If the new name is removed it will revert back to the original of Upper Level, Mid Level or Base Level. The labels are also stored under the Supervisor Menu / Maintenance Menu / System Maintenance / Logical Names.
Default Filter Setup
Default filtering options can be setup for Energy Force users manually, imported manually or imported through Automated Tasks.
To view, setup users manually, or to manually import from a file navigate to Supervisor Menu / Set Up Options / Filtered View Menu / Default Filter Setup.

To add a user manually, select Add and enter the User Id, select the filter levels for the user, then choose Set As Default to save. If the user adding or modifying is the same as the user logged into Energy Force, a message displays allowing the filters to be applied at that point. When a user adding or modifying the defaults is not the user logged into the Energy Force, the user already logged into Energy Force will need to exit and log back in for the new default to take affect.
Importing Filter Groups and User Defaults
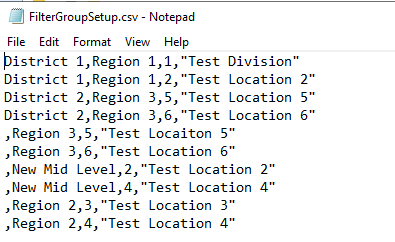
Filter Levels Groups can be imported into Energy Force using a comma delimited CSV file manually or through Automated Tasks. The file must be named FilterGroupSetup.csv, placed in the Interface folder, and must contain the following columns (no header row in file):
- Upper Level Name, Mid Level Name, Base Level Value (Location or division number), Base Level Name

To manually import navigate to Supervisor Menu / Set Up Options / Filtered View Menu and select Import Group Setup.
To import using Automated Tasks navigate to Supervisor Menu / Maintenance Menu / Automated Tasks Menu / Automated Tasks. Create an entry by holding Ctrl + C for Create mode and double-clicking in the Task field. Select Filter Group Import from the Select Automated Task window. No parameters are required.
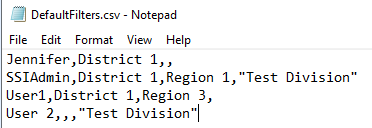
Default Filter Setup can also be imported using a comma delimited CSV file. The file needs to be named DefaultFilters.csv, placed in the Interface folder, and must contain the following columns (no header row in file):
- User ID, Upper Level Name, Mid Level Name, Base Level Name

To import manually navigate to Supervisor Menu / Setup Options / Filtered View Menu / Default Filter Setup and select Import Setup.
This file uses the same automated task as the Filtered Group automated task. The task will run with one file or with both files.
Using Filter Views
To select the filtering options, click on the status label then the magnifying glass next to the level to filter by. Highlight the level filter and choose Select. to return to the Apply Filter window.


Example: The Base Level Test Division was selected.
The chosen filters will display with an option for multiple levels to be selected for filtering. Select Apply to apply the filtering options selected.
When an Upper Level has been selected only the Mid Levels associated to the Upper Level will be available to select from. Same thing applies to the Mid and Base Levels, once a Mid Level is selected, only the Base Levels in the group setup associated to that Mid Level are available for selection.

Optionally set the selected filters as default by choosing the Set As Default button or return to all Locations or Divisions from the filtered view by clicking the filter at the bottom and choose Clear then Apply.
Once filtering options are chosen and applied the name of the lowest filter will be displayed on the status label. The label displays no matter which screen the user is on.

When the filter is turned on and a Location or Division is selected, only customers that have at least one active tank or service location with the selected Location or Division or customers with no active tanks or service locations will display in Customer Maintenance. If a customer has tanks or service locations that are in multiple Locations all of the tanks and service locations will be displayed as long as one of those is in the filtered Location. The same logic applies to Call In Entries and Ticklers. Journals are filtered by the Posting Division. If data is Location based, Journals in Division 1 will also display.
Note: The filter will need to be set each time users log into Energy Force unless Default Filters are set.