Although Meter Billing is not located in the Sales Entry menu, it is still considered a part of the posting process.
Enter Meter Readings
- From the Master Menu, select Meter Menu.
- Choose Reading Entry.
- On the Meter Entry Journal Select window, choose Create.
- Enter the Division and User ID.
Note: The meter entry journal date can not be changed as it is the date the read was entered. - Choose Select.
- On the Meter Reading Entry Screen window, enter the Cust# or press F5 to select from the customer list.
- If the Meter RRN field is yellow, this indicates the customer has multiple active meters, press F5 to select from the list to ensure the reading is posted to the correct meter.

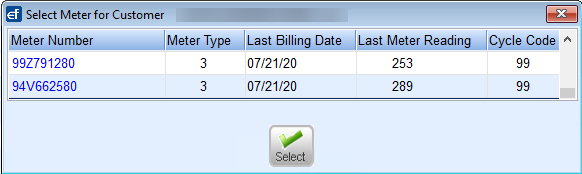
- After the meter is selected, information about the meter will fill in on the right hand side of the screen. The lower section displays previous meter reads that have been entered for this meter. This is beneficial to review to ensure the current reading about to be entered is correct.

- In the Reading Date field, enter the date the meter reading was taken.
- Enter the new meter reading in the Reading field.
- In the Reading Type area, enter C for Customer, H for Handheld, M for Modem, or P for Postcard.
- Select the down arrow to enter another customer or choose Save if finished entering readings.
- Select Exit.
- From the Meter Menu, choose Meter PrePost Report.


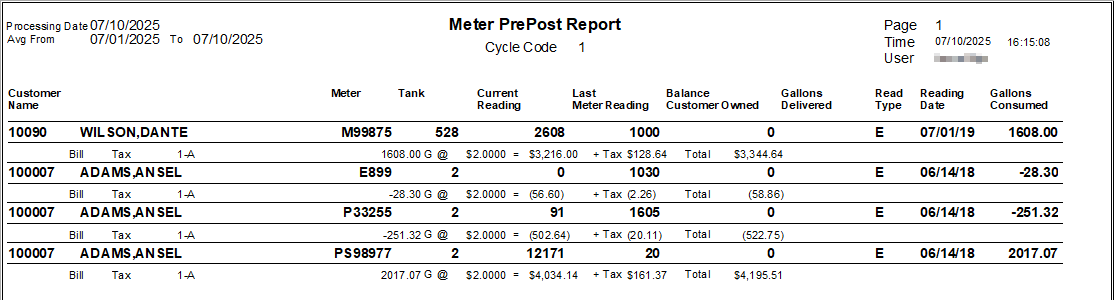
Meter PrePost Report
The PrePost Report shows whether or not this is a contract, taxed or not, Price Code, Contract Number.

- On the Meter PrePost Report window, enter the Division.
- In the Enter Cycle Code field, enter the Meter Cycle Code.
- Enter the Process Date.
- In the % Over/Under field, enter the percentage difference to exclude from report.
- Enter the Location Code - If processing for all locations, leave as 0 for All.
- Select Export to Excel if desired, otherwise the report will default to video.
 If entering 30%, customers who have a reading within 30% of the last billed reading will not print on the report. The meter reading will still process and the total charges will be included.
 - Select Process.
- On the Print window, choose Print.
- After reviewing the report for errors and making any changes, process Meter Billing.
 If entering 30%, customers who have a reading within 30% of the last billed reading will not print on the report. The meter reading will still process and the total charges will be included.
Always print and review the Meter PrePost Report before processing meter billings to the customer’s account. If processing a correction billing for a voided entry, the date must be different than the date of the voided entry.
Process Meter Billing
- From the Master Menu, select Meter Menu.
- Choose Process Meter Billings.
- On the Process Meter Readings window, enter the Division to process.
- In the Enter Cycle Code field, enter the Cycle Code to process.
- Enter the Location Code - If processing for all locations, leave as 0 for All.
- Select Export to Excel if desired, otherwise the report will default to video.
- In the % Over/Under field, enter the percentage difference to exclude from report.
- Enter the Location Code - If processing for all locations, leave as 0 for All.
- Select Export to Excel if desired, otherwise, the report will default to video mode.
- Select Process.
- Close the Select a Meter Journal window.
- The sales journal will display in the Meter Sales program. Review for accuracy.