Connect Truck Computer to the Network
- Open Windows Explorer.
- Type \\servername\ctls93\dd85\energytrack in the Path field at the top of the window.
- If prompted, enter credentials to access the server. Make sure to check the Remember my Credentials box.
Run Windows Updates
- Be sure Windows has all current updates downloaded and installed on truck computer.
- After updates are installed, turn off the automatic updating of windows. This will keep the truck computers from trying to update at inconvenient times. Additional Windows updates can be downloaded and installed manually when time permits.
Modify ETENERGY.INI
- Open the file called ETEnergy.ini
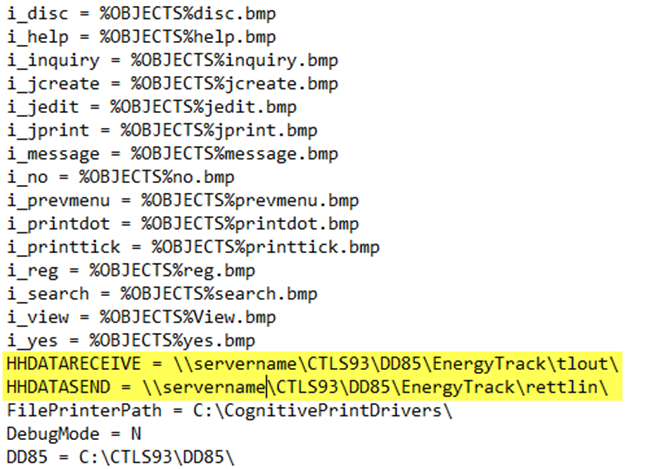
- Locate the lines for HHDATARECEIVE and HHDATASEND. The paths should be as follows:
 HHDATARECEIVE = \\servername\ctls93\dd85\energytrack\tlout\
HHDATASEND = \\servername\ctls93\dd85\energytrack\rettlin\ - Modify servername as necessary.
- Save and then close the ETENERGY.INI file.
- Right-click ETEnergy.ini and select Copy.
- Paste the file into the same location as the original. This will create a copy of the file that can serve as a backup. A Constant File error message will appear. Refer to the Troubleshooting Guide.
Exclude Folders from Virus Scans
- C:\Ctls93
- C:\Userproc
Verify Folder Permissions
- C:\Ctls93 – Read and Write (full control)
- C:\Userproc – Read and Write (full control)
Set Correct Printer as Default
- Navigate to Devices and Printers in the Control Panel.
- Right-click the Cognitive Advantage 4inch printer.
- Select Set Default Printer.
- Choose Cognitive Advantage 4inch2.
Set Printers to Correct Ports
Cognitive Advantage 4inch and Cognitive Advantage 4inch2 are set to the correct USB Port and print test pages.
- Navigate to Devices and Printers in the Control Panel.
- Right-click the Cognitive Advantage 4inch2 printer.
- Select Printer Properties.
- Choose Cognitive Advantage 4inch2.
- Select the Ports tab.
- Select the correct USB Port
- Select Apply then OK.
- Repeat Steps 1 - 3.
- Choose Cognitive Advantage 4inch.
- Repeat Steps 5 - 8.
- Remove the truck computer from the cradle and re-seat.
Verify Printer Preferences set correctly
- Navigate to Devices and Printers in the Control Panel.
- Right-click the Cognitive Advantage 4inch2 icon.
- Select Printing preferences.
- Choose Cognitive Advantage 4inch2.
- Be sure Paper Format is set to Inch.
- Set the Orientation to Portrait and do not check the Rotate by 180 degrees option.
- Set the Width to 4.33 and the Height to 8.25.
- In the Unprintable Area, set Left to 0.23 and the rest to 0.00.
- On the Advanced Setup tab, choose Direct Thermal and Black Bar.
- Select OK.
- Right-click the Cognitive Advantage 4inch2 icon.
- Select Printing preferences.
- Choose Cognitive Advantage 4inch.
- Be sure Paper Format is set to Inch.
- Set the Orientation to Portrait and check the Rotate by 180 degrees option.
- Set the Width to 4.33 and the Height to 6.25.
- In the Unprintable Area, set Right to 0.23 and the rest to 0.00.
- On the Advanced Setup tab, choose Direct Thermal and Black Bar.
- Select OK.
Set Meter Cable to Correct Port
- Right-click My Computer (may be listed as HHXXXX).
- Select Manage.
- Choose Device Manager from the left.
- Expand Ports(Com & LPT).
- Right-click the device being used for meter communication. If using serial-to-serial communication, this will be listed as Silicon Labs CP210x UART Bridge when using CF-U1 or CF-H1/H2 or USB to Serial when using FZ-G1. If using USB-to-serial communication, this will be listed as Prolific USB to Serial or Gigaware USB to Serial when using all models.
- Select Properties.
- On the Port Settings tab, select Advanced.
- In the lower left, change to Com3 (if using a meter other than LCR, it must be Com3)
- If Com3 is occupied, use Steps 1-9 to change it to a different number.
- Restart the truck computer.
Set Up Meter Communication
If using LCR meters, the LCRSetup utility must be set up to communicate to the meter properly (located at C:\Utils\LCRSetup.exe)

- Port Name – This is the Com# assigned to the cable used for communication to the meter. Check in Device Manager under Ports(Com&LPT). It will be either the Silicon Labs device or the USB to Serial Device.
- Baud Rate – This is the rate at which data is transmitted through the device. Normally, this is 19200 but some meters may need to be set to 9600.
- Baud Search – Allow the meter to search baud rates on which to communicate. This is normally set to No.
- TxEnable – This is the communication protocol with the meter. This is normally set to !RTS but, if no response is received from the meter, it may need changed. Try the All option in this menu a response is not received.
- Retries – This should always be set to 2.
- Timeout – This should always be set to 200.
- Test Node – This is the number assigned to the meter. If using a propane setup, it will normally be 1. If using a fuel setup, this will normally be 1 and 2. If the meter was not changed during initial setup, this field defaults to 250. Enter the parameters listed and the select Test. If communication is successful, a message will display indicating the node responded successfully. If a message displays indicating the node is not responding, try a different Test Node (usually 1, 2, or 250).
If using a meter other than the LCR, once the communication cable has been set to the correct port, restart the truck computer then open EnergyTrack. Navigate to Utilities / Test Hardware and select the meter. If prompted, select Get Totalizer and verify a totalizer value is received.

 HHDATARECEIVE = \\servername\ctls93\dd85\energytrack\tlout\