Overview
Cylinder Tracking allows for the setup of Cylinders in the customer tank file to keep track of exchanges that are made with each delivery.
- On the Tank Info screen, press Ctrl+C to create an entry for a Cylinder.
- Select Y for company-owned or N for customer-owned. If company-owned, a list of Inventory Tanks will be displayed. Select the Cylinder. If the Cylinder is not present in the Inventory file, it will need to be created.
- Under Tank/Meter Maintenance, set up a tank with a Tank Type of CY or a custom Tank Type. (Ex: C4 for 40# cylinder or C2 for 20# cylinder).
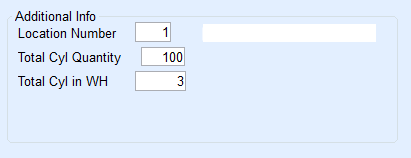
- Under Additional Info add the Location code of the Cylinders (if tracking), Total Cyl Quanity, and Total Cyl in WH (Yard). Whenever there is a transaction, these fields will be adjusted automatically. The Cylinder Type only needs entered once.

- Continue with the setup similar to a regular propane or refined fuel tank by entering Customer Type, Delivery Type, etc.

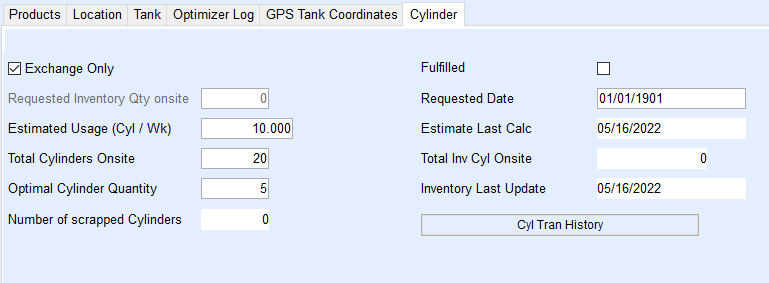
When entering a Cylinder Tracking Tank Type (i.e. Cy, C4, C8, etc.), the system will display a form asking for additional information relevant to Cylinder customers. Important information includes:
- Exchange Only – The system will not allow dropping Cylinders in a quantity different than the quantity picked up. If that option is marked, Requested Quantity will be disabled.
- Requested Quantity – The system will check the quantity on hand and the total requested unfulfilled quantity and show the available quantity. The system will allow a Requested Quantity greater than the quantity on hand but will issue a warning.
- Requested Date – This is available for Will Call customers only. The system will create a single Julian date record with the requested information.
- Estimated Usage – This field will have an initial estimate of Cylinders per week from the customer and will be updated every posting.
- Cyl Tran History – The Cyl Tran History automatically gets updated at the time of Cylinder Sales Processing.
Set Up New Cylinder Tracking
- Navigate to the Customer Maintenance Menu and select the appropriate Customer.
- Select Tank Info and press Ctrl+C to add a tank.
- Enter Yes for Co Owns.
- Search for the Cylinder Tank Type (C2, C3, etc.).
- Select the Cylinder Tank Type to be applied to the Customer account. This will return to the Tank Setup screen.
Note: A Cylinder tab will appear next to the GPS Tank Coordinates tab. - Continue with setting up the cylinder similar to setting up a standard tank indicating Customer Types, Delivery Types, Products, pricing, etc.
- Select the Cylinder tab.

- Choose Exchange Only.
- Optionally enter the number of estimated Cylinders to be used per week in the Estimated Usage (Cyl / Wk) field.
- Enter the total Cylinders to be applied to the site in the Total Cylinders Onsite field. This will reduce the inventory available in the warehouse for the Tank Type.
- Enter the Optimal Cylinder Quantity to keep on site.
- Select Save. Cylinder exchanges can now be performed in Energy Force and EnergyTrack.

