Pressing Tab moves through the fields.
Step 1: Tank Info

- Press Ctrl+C or select Create.
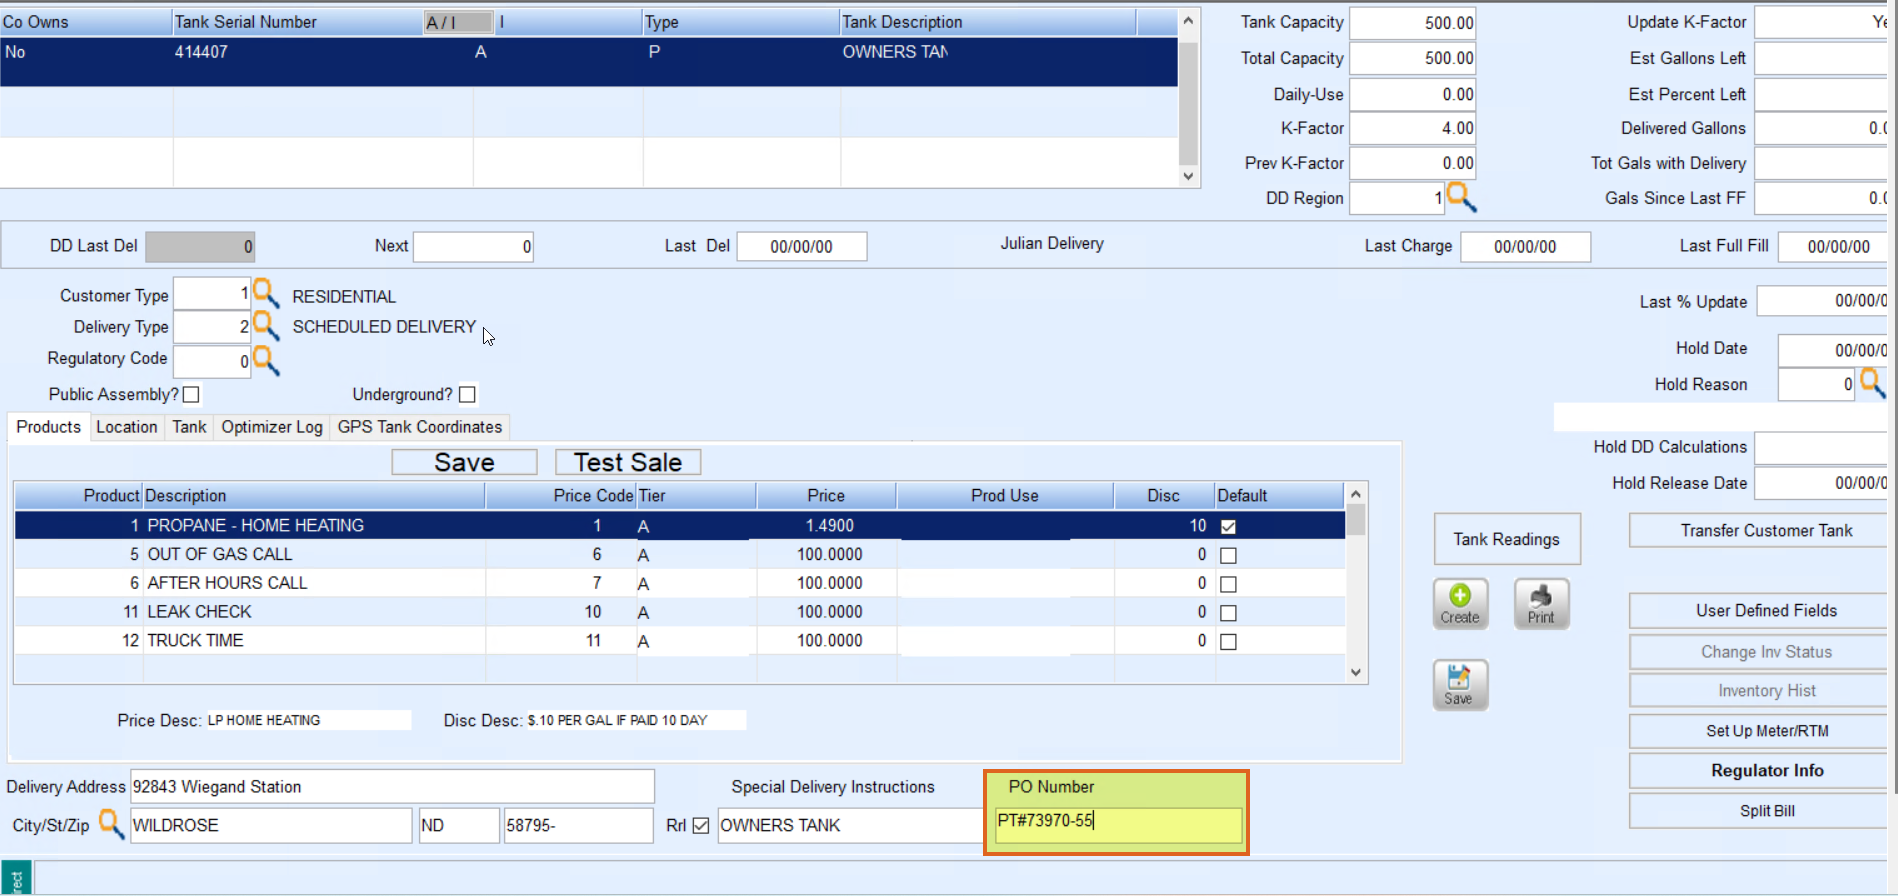
- In the Co Owns field, enter Y for company-owned or N for customer-owned.
- If Y is entered, highlight the tank from the Tank/Meter Maintenance window and choose Select.
- The Tank Serial Number and Type will autofill based on the tank selected from inventory.
- Enter Est Gallons Left in the Tank if applicable and select OK.
- If N is entered:
- Enter the Tank Serial Number.
- Select the Tank Type by pressing F5 or by selecting the Browse button.
- If Y is entered, highlight the tank from the Tank/Meter Maintenance window and choose Select.
- In the Tank Description field, enter a description for the tank.
- In the Total Capacity field:
- A company-owned tank will automatically display the tank size.
- Non company-owned tanks require the size of the tank to be entered manually.
- Enter the Total Capacity of the tank.
- Enter Daily-Use gallons (gallons used on a daily basis for non-heating appliances).
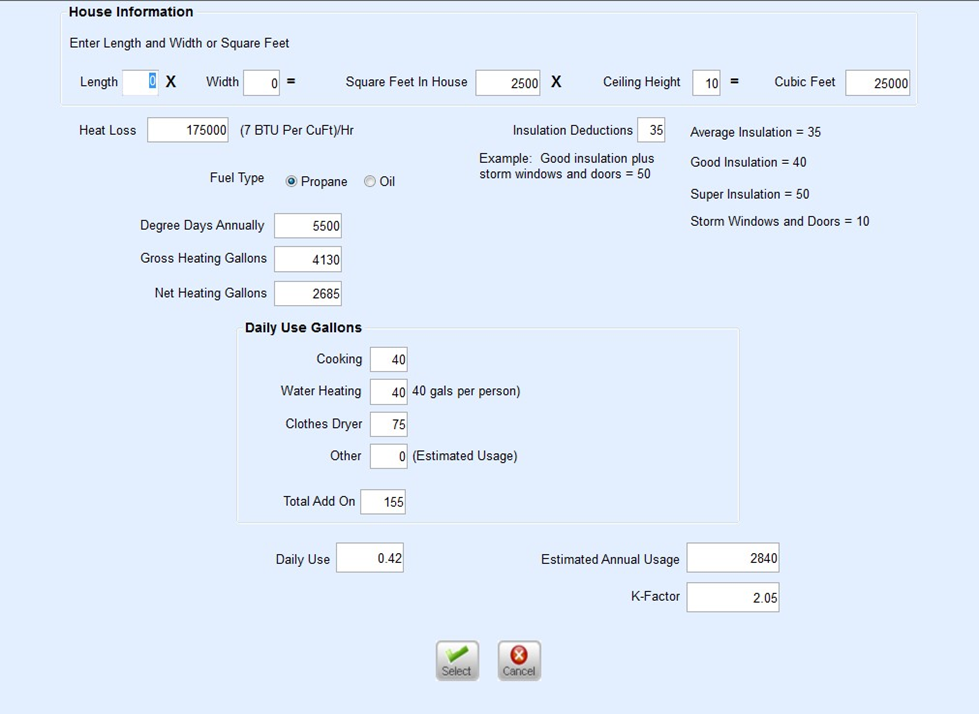
- Enter the K-Factor. Press F5 in this field if the K-Factor is unknown to navigate to a Calculation screen.

- If using the K-Factor Calculator, enter known House Information. Daily-Use gallon information (non-heating appliance usage) can be entered as well to calculate a more accurate daily usage. Choose Select when finished to return to the Tank screen. The K-Factor and Daily-Use will automatically populate.
- Tab through the Prev K-Factor field. This information will auto-populate as deliveries are made.
- In the DD Region field, enter the degree day region the tank is in.
- In the Update K-Factor field, enter Y to update the K-Factor automatically during sales ticket posting or N so the system does not update the K-Factor automatically.
- The system automatically updated the Est Gallons Left and Est Percent Left fields based on the value entered in Step 4.
- Tab through Delivered Gallons, Tot Gals with Delivery, Gals Since Last FF, DD Last Del, Next, Last Del, Last Charge, and Last Full Fill. These fields automatically get updated at the time of the delivery posting.
- In the Customer Type field, press F5 or select the Search button and choose accordingly. This information can be entered manually as well.
- Press F5 or the Search button to select the Delivery Type. This information can be entered manually as well.
- The Regulatory Code is an optional field. Press F5 to select a Fee or Tab to the next field.
Step 2: Location Tab
This area is very important as it ensures the correct taxing will be applied if based on County, Township, or School District.

- Enter the Route code.
- Enter the Route Seq # if there is a particular time this customer needs to have a delivery.
- Enter the Location code if tanks are validated by location
- Enter the County. Use F5 or select the Browse icon and choose from the list.
- Enter the Township. Use F5 or select the Browse icon and choose from the list.
- Enter the School District. Use F5 or select the Browse icon and choose from the list.
Step 3: Tank Tab

- Enter Yes or No to indicate if the Company Paints.
- Year Painted and Type of Paint automatically displays from the Tank/Meter Maintenance screen if company-owned. Otherwise, enter the information accordingly.
- Enter the Tank Condition (Good, Needs Painting, etc.).
- Indicate if price changes are allowed by entering Yes or No in the Price Chgs? field.
- The Manufacture Date is automatically populated from the Tank/Meter Maintenance screen.
- Enter the Date Tank Set.
- Enter the last date the gas was checked in the Gas Check Date field.
- Enter the last date the leak test was performed in the Leak Test Date field.
Step 4: Products Tab

- Press F5 to Select a Product Type.
- Enter a Price Code or press F5 to choose from a list.
- Select the Tier or press F5 to select from Tier list. The Price will populate when the Tier is chosen.
- Select Product Use if special taxing conditions apply. Otherwise, leave this field blank
- Enter a Discount Code in the Disc column or press F5 to select from a list. If a discount does not apply, leave this field blank.
- Opt to set as Default. More than one product can be listed on the Products tab. Be sure to select the correct defaulted product.
- Directly below the Products tab is the Delivery Address. The address will automatically default to the customer address. Update this information to display the ACTUAL delivery address.
- Enter Special Instructions for the driver (i.e. Do not drive on lawn, Key under rock, etc.) up to 30 characters in the PO Number field. A user right is required for this field. The PO Number will automatically populate onto the EnergyTrack Invoice and Manual Sales Posting screens and will also print on the Invoice. The PO Number can be modified on the Invoice screen if necessary.

- Enter driving Directions for how to get to the delivery address.
- Press Ctrl+Q to save or select the Save button.
Additional Notes
On the Products tab, a feature called Test Sale allows the option to test a 100 gallon sale to see if taxes are applied properly. If there is more than one product, select the item in question and select Test Sale.
If the customer is not being taxed properly, look to see that the delivery address is correct.
Step 5: GPS Tank Coordinates
The GPS Tank Coordinates tab displays the coordinates associated to a tank that has been plotted on the EnergyMap. To modify this information, press Ctrl+M and manually input the information. Press Ctrl+Q to save. Use the Plot button on the Tank screen (if the tank has never been plotted before) and it will open EnergyMap to manually plot. Manual plots and handheld postings from handhelds with internal GPS will automatically update the GPS Tank Coordinates tab.

Step 6: Optimizer Log Tab
The Optimizer Log tab displays each time the tank has been scheduled within the last six months. Information will only display in this tab for Optimizer Plus users.

Step 7: Delivery Information
Delivery Address
The Delivery Address listed on the Tank screen should reflect the actual address of the tank. Having the correct Delivery Address is especially important for taxing purposes and is also transferred to EnergyTrack Re-Engineered.

Special Instructions
This information pertains to special instructions drivers need to follow when making deliveries. This information transfers down to EnergyTrack Re-Engineered.

Directions
This section is for directions on how to get to the customer tank and also displays on EnergyTrack Re-Engineered.

PO #
Energy Force stores and processes a standing PO # manually entered in a field to the right of Special Delivery Instructions on the Tank screen. A user right is required to modify this field.

The PO # will automatically populate onto the EnergyTrack Invoice and Manual Sales Posting screens and will also print on the Invoice. The PO # can be modified on the Invoice screen if necessary.


