The Scheduled Delivery program displays scheduled deliveries generated from Energy Force (via Optimizer, EnergyMap, etc.).
Overview
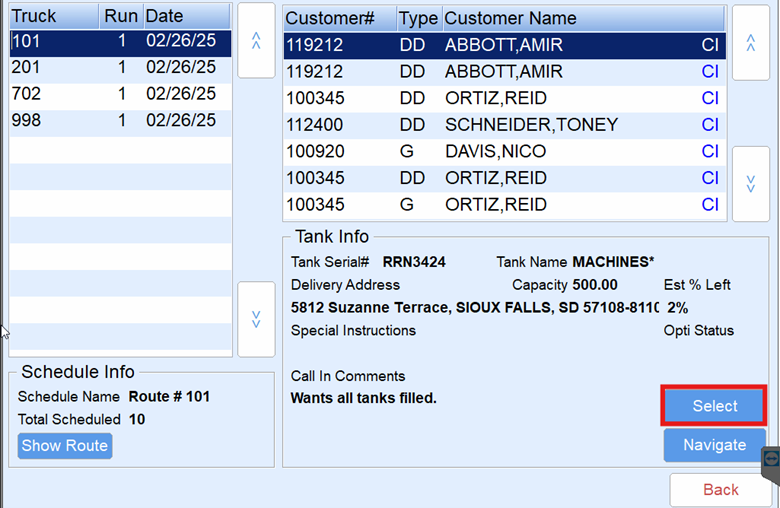
- Each schedule is listed by Truck/Route number and scheduled delivery date in the left side of the screen.
- Scheduled tanks appear in delivery order in the upper right side of the screen.
- Tanks listed in bold font with CI indicate Call-In tanks.
- If a route exceeds three days, tanks will no longer appear in the detail column.
- The Route Preview screen displays an overview of the route in Map view with a required internet connection.
Note: EnergyTrack will use Bing Maps for Navigation due to Windows maps coming to an End of Life as of July 2025 and can no longer be used. - If the route is generated via the Schedule Tank Deliveries program in Energy Force, it will not display a map preview.
- Voice activated Turn-by-Turn Navigation is available if utilizing Co-Pilot.


Making a Scheduled Delivery
- Select Scheduled Delivery.
- Choose the Schedule in the top left column of the screen.
- The customer and tank information will display on the right side of the screen.
- If using Optimizer Plus or EnergyMap, the scheduled items will appear in order for delivery.
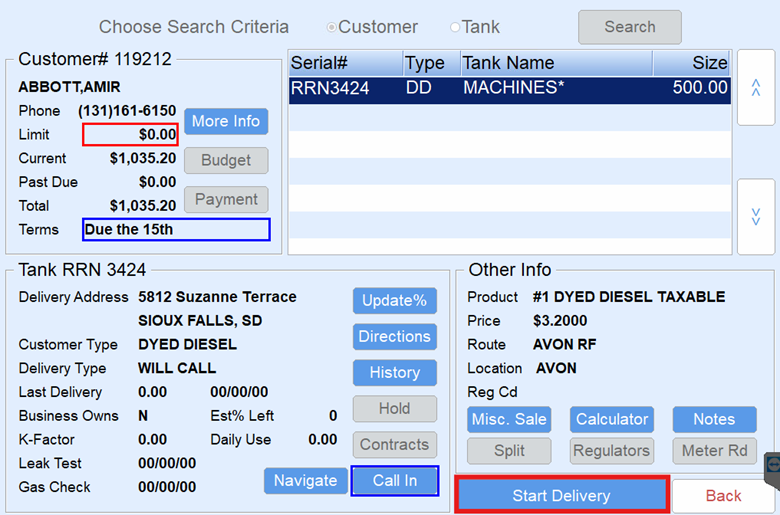
- Highlight the customer account/tank and choose Select. This will display the customer account information.
- Select Start Delivery to advance to the Delivery screen.
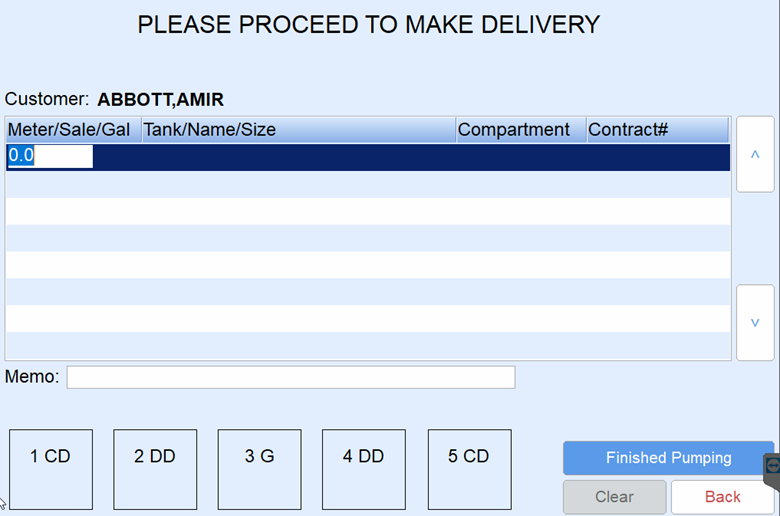
- The Multi-Delivery Pumping screen will appear. Begin pumping gallons. Multiple gallon deliveries can be pumped and invoiced on one ticket.
- For electronic registers:
- LCR – Turn the red knob to Run. Pump the fuel and then turn the red knob to Stop. Allow the switch to rest on Stop for two seconds and then turn to Print. After the delivery is complete, a meter block will print on the Blaster Printer located in the cab of the truck. The delivered gallons will also be imported into EnergyTrack in the Meter/Sale/Gal column.
- LC IQ – Press Start on the register to begin pumping fuel. Press End/Print when finished. After the delivery is complete, a meter block will print on the Blaster Printer located in the cab of the truck. The delivered gallons will also be imported into EnergyTrack in the Meter/Sale/Gal column
- MidCom ECount – Press Start/Stop on the register. The register will reset to 0.00. Pump the product and press Start/Stop when finished pumping. Press the Print button. A meter block will print on the Blaster printer located in the cab of the truck and the delivered gallons will be imported into EnergyTrack in the Meter/Sale/Gal column.
- Neptune E4000 – Press the Start/Enter button on the register. The Neptune register will reset to 0.00. Pump the product and press Stop/Cancel when finished. A meter block will print on the Blaster Printer located in the cab of the truck and the delivered gallons will be imported into EnergyTrack in the Meter/Sale/Gal column.
- TCS 3000
Method 1: Press Start/Enter on the register. Use the navigation arrows to select the product and press Start/Enter. If performing a direct delivery, press the Start/Enter button to begin pumping. Press Stop/Cancel to pause the delivery when finished pumping and then press Stop/Cancel a second time to finish the delivery. A meter block will print on the Blaster Printer located in the cab of the truck and the delivered gallons will be imported into EnergyTrack in the Meter/Sale/Gal column.
Method 2: If performing a preset delivery, press the Preset button and enter the preset amount. Press the Start/Enter button to begin pumping. Once the preset amount is reached, the meter will automatically finish the delivery and print the meter block and the delivered gallons will be imported into EnergyTrack in the Meter/Sale/Gal column.
- For non-interfaced registers:
- Pump gallons on register as usual.
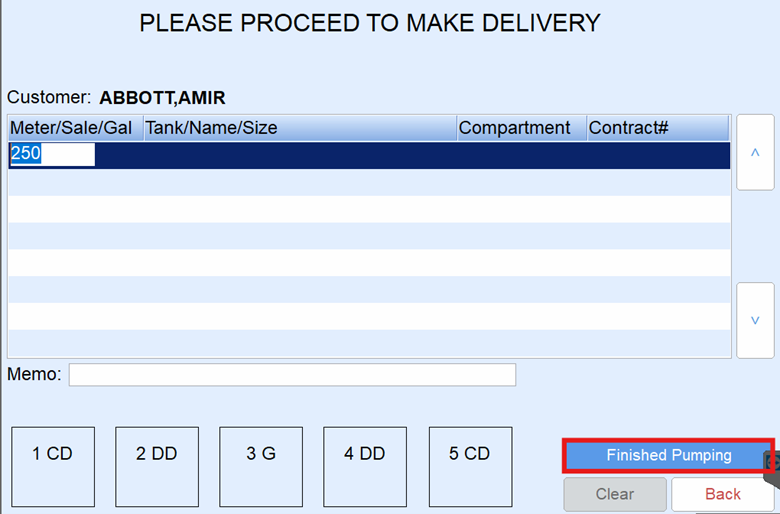
- Enter gallons pumped in the Meter/Sale/Gal column of the Multi-Delivery Pumping screen by tapping in the field and using the on-screen keyboard.
- Select Finished Pumping when gallon deliveries appear on the Multi-Delivery Pumping screen. If the customer has one tank, the tank will automatically default in the Tank/Name/Size field. Proceed to Step 11.
- If the customer has multiple tanks, highlight the gallons pumped and select in the Tank/Name/Size column.
- Customer tanks will display. Select the tank and choose Select to return to the Delivery screen.

- While the delivery gallons are still highlighted, select the compartment (Cm) for the delivery (2DD located in bottom left corner of Delivery screen). An optional memo can be added to the delivery gallons. This memo prints on the Invoice and is specific to the highlighted gallons.
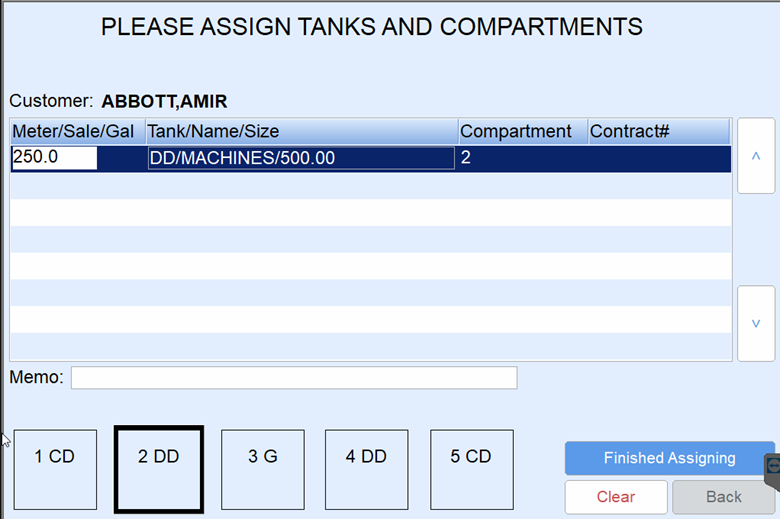
- Repeat Steps 8 - 11 for each set of gallons. Select Finished Assigning once all gallons have been assigned. The Invoicing screen will appear.
Note: If zero or negative gallons import from the register (i.e. line creep) into the Delivery screen, those gallons will be removed to prevent invoicing issues. A message displays stating the entry is being removed. If entries still exist, the driver will continue as normal to assigning. If no entries remain, a message displays No deliveries greater than 0 gallons to process and returns to the Tank screen. Any removed amounts will be included as a variance. Item that comes in and is supposed to be a credit (such as a pump out), will still come in as a positive number and process as usual.
 - Review the Invoice for accuracy. If the invoice has more than one product, tap on the product line in the lower left portion of the screen to display details.
- Department – The product is defaulted based on the tank default in Energy Force. Select Choose if modification of the product is necessary. For gallon deliveries, the system will only allow a selection of pumpable products.
- Gallons – Gallons cannot be modified if received from an electronic register. If using a non-interfaced register, tap in the Gals/Qty field and use the on-screen keyboard to modify as necessary.
- Price – Tap in the Price field and use the on-screen keyboard to modify pricing as necessary. If gallons apply to a contract, the price cannot be modified.
- End % – Each set of gallons delivered require an ending percentage (the Start % is calculated from here based on tank size). The End % field will populate as 99%. Make sure to enter the ending percent for each set of gallons listed on the Invoice.

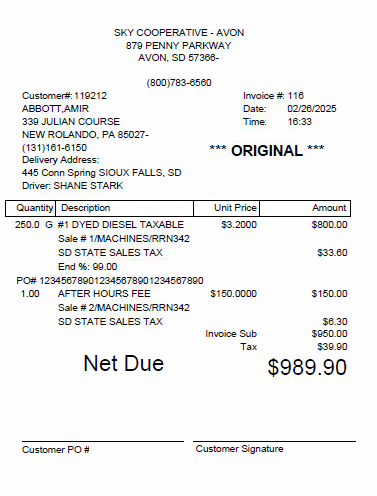
- PO# – Optionally tap in the PO# field to enter the Purchase Order number. This number prints on the customer Invoice.
- Add – If additional items, such as labor or delivery fees, need to be added to the invoice, select the Add button. This will add a line to the invoice with a qty of zero.
- Highlight the 0.00 line item.
- Select Choose to assign a department.
- Select the Department from the product listing that appears. Tap in the Product column and begin typing to search for a product if necessary.
- Choose Select to update the Department associated with the added item.
- Enter the Qty and Price associated with the department selected.
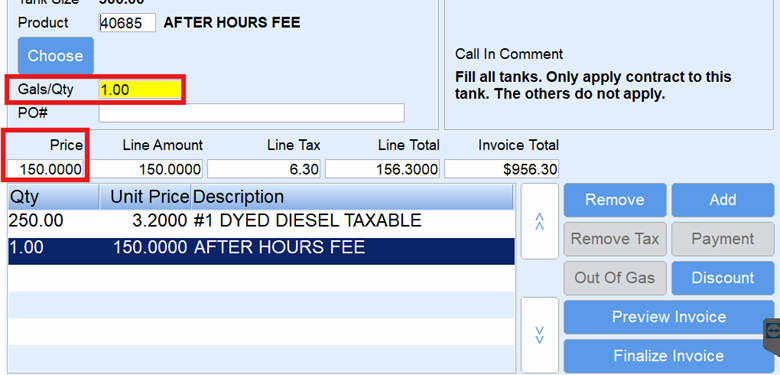
- Repeat these steps for any additional added items.
- Choose Continue. The Confirm Delivery screen will appear.
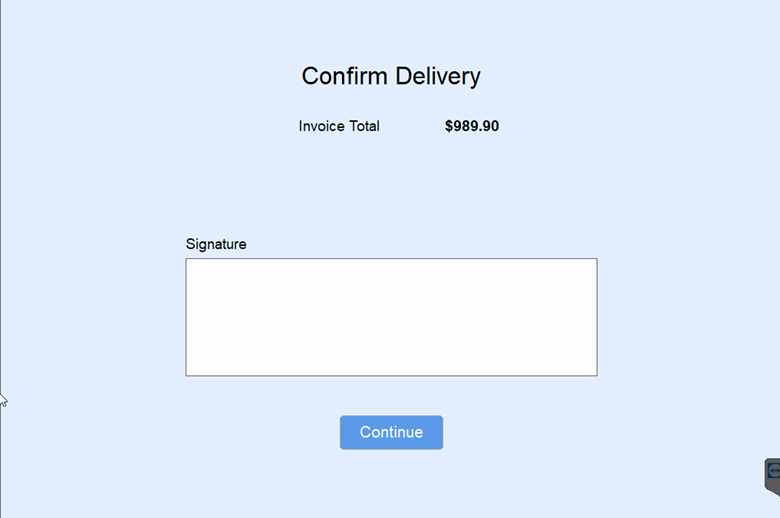
- If a customer requires a signature on the Invoice, tap in the Signature field, have the customer sign, and select Continue. If a signature is not required, select Continue.
- Select the number of invoices to print. The Scheduled Delivery screen will appear and the previously selected tank will be removed.


 Any removed amounts will be included as a variance. Item that comes in and is supposed to be a credit (such as a pump out), will still come in as a positive number and process as usual.


Invoice Screen Additional Options
- Preview – This allows the driver to see an overall preview of the Invoice prior to finalization. If the Invoice appears correctly, Continue can be chosen and EnergyTrack will proceed to the Signature screen. If further changes are necessary, select Modify to return to the Invoice screen.
- Remove – This requires a user right to be utilized. Select this button to remove non-pumpable items from an Invoice. Pumpable items cannot be removed from an Invoice.
- Discount – Discount codes can be associated with a tank in Energy Force. If a discount needs to be modified or removed, select this button and choose accordingly.
- Remove All Taxes – This option requires a user right to be utilized. Select this button to remove ALL taxes on an Invoice. Taxes will be removed from ALL line items. Once taxes have been removed, they cannot be added back to the Invoice.
- Out of Gas – This button is not utilized for EnergyTrack – Refined Fuels.
- Payment – The driver can select this to enter a payment from the customer. Reference Payments for proper procedures for entering payments in EnergyTrack.
- Continue – Finalize the Invoice.