Payment Posting
Use Payment Posting to enter regular payments, charge card payments, transfers, refunds, and credits on customer accounts. Discounts can be applied to a customer’s account at the same time the payment is posted. After payments have been entered, print the payment journal for balancing. A payment can be voided and re-entered if necessary.
- From the Posting Menu, select Payments, Transfers, or Refunds.
- On the Please Select a Payment Journal window, choose Create.
- In the Division field, enter the Division for which payment tickets are being entered.
- Enter the Date the payments were received.
- Enter the User ID.
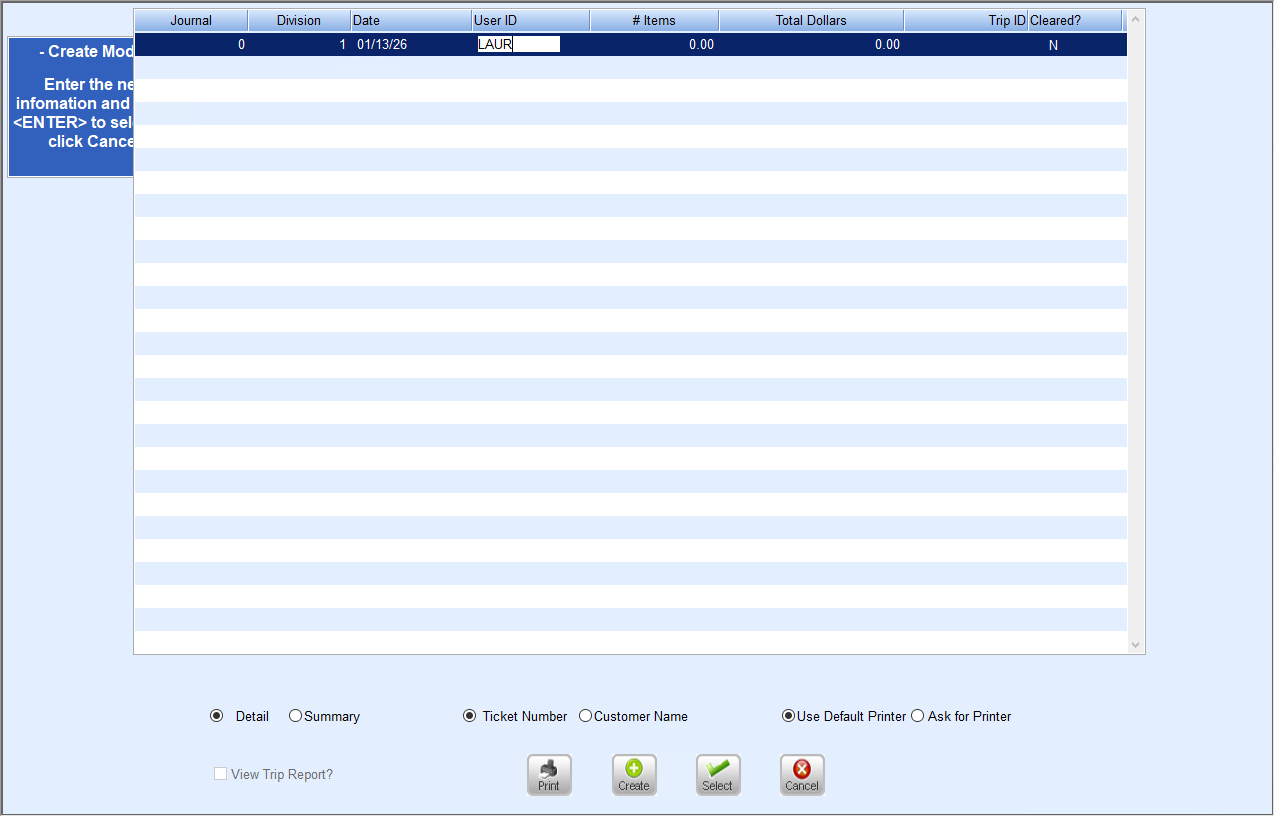
- Choose Select.
- On the Payment Disc Posting window, enter the customer number in the Cust# field or press F5 to select from the list.
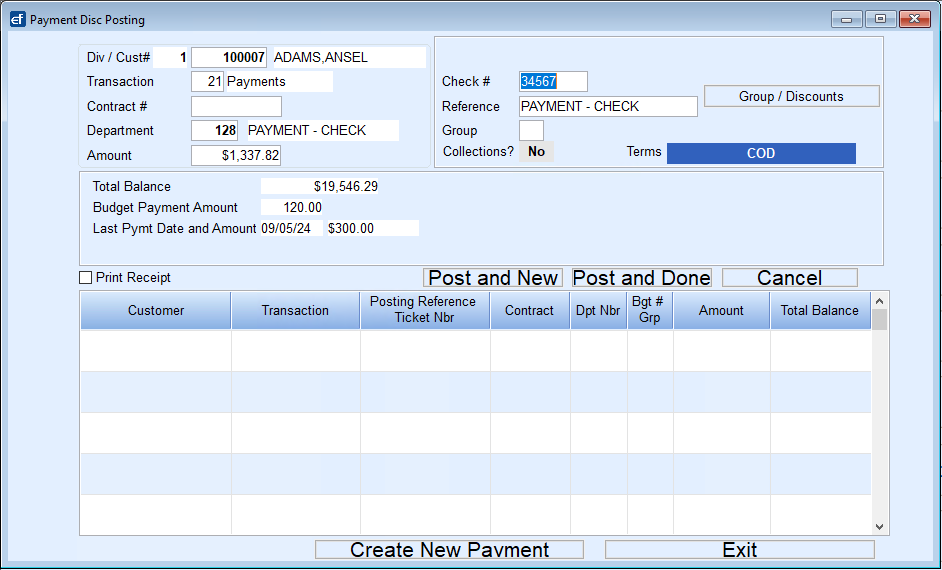
- In the Transaction field, the Transaction Code will default to 21. The Transaction Type can be changed if needed. If the transaction is a contract payment 23 the following appear:
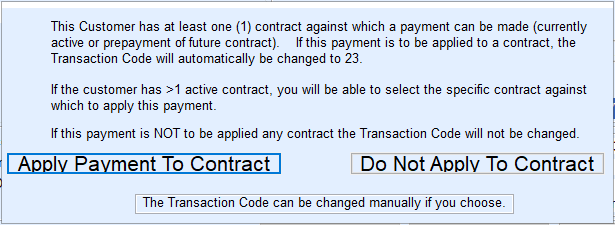
- The payment will automatically be applied to the oldest active contract.
- In the Department field, the Received on Account department set up in Division Setup displays. The department can be changed if necessary.
- Enter the payment Amount.
- In the Check # field, enter a reference number for the payment.
- In the Reference field, the department description will display but can be changed. The reference description prints on statements.
- To pay more than one ticket with the payment, enter a one-character code in the Group field, select Group/Discounts, and enter the one-character code next to each history line to which the payment applies to. Customer history will display the one-character code used to group the tickets into one payment.
- To apply a discount to the payment, select Group/Discounts. On the Customer History window, select the Allow Discount checkbox for the discount needing applied to the customer account.
- In the Print Receipt? field, select Print Receipt box to to print a receipt for the payment in generic statement format.
- Select Post and New.
- Repeat Steps 8 - 17 until all payments are entered.
- Close the Payment Journal # window.
- Print or Print Preview the Payment Journal and verify that the Journal amount matches the Department Summary amount.


Note: Journals can only be accessed by one user or session at a time. If a second user or session attempts to select a journal that is already open, a message displays stating the user who is already accessing the journal. Also, the full user name will be logged in the Journals Open table instead of just the first 4 characters. This will help with preventing payments from not being included in the master clear PM.dat file.
Cash Rounding
Pennies have been discontinued and many sales don’t end in increments of $.05, causing a need to account for the rounding of cash payments. This table allows for creation of various Cash Rounding scenarios found at Supervisor Menu / Setup Options / Cash Rounding Rules.
Rules can be setup to:
- Round to $.05, $.10 or $.25.
- Round to the nearest using standard rounding rules, round up, or round down.
- Department is set to post the amount the cash payment was rounded, a new department for rounding amounts can be setup and used.
Setup a new Department for the amount a payment was rounded and fill out the Cash Rounding Rules table.
Payment Posting
Penny payment rounding has been added to payment posting, where an automatic entry will be created for the rounding. The payment screen layout has been updated to include the rounding rules.
The Penny Rounding rules need to be setup in Supervisor Menu / Setup Options / Cash Rounding Rules first. On the Payment Disc Posting screen, when taking a cash payment, if the amount needs to be rounded, check the Rounded Payment checkbox.

The Amount box holds the full amount of what the customer wants to pay.. The Rounding Rule will display and show the amount of cash required in the Rounded Pymt field. If more than 1 rule exists, the rule displayed can be changed by double clicking or using F5 in the the Rounding ID field.
The amount in the Rounded Pymt field will post to the Cash Payment Product\Department. The difference between the Amount and the Rounded Pymt will post to the Department Setup in the Cash Rounding Rules.
For Example: A customer would like to pay $44.77 (enter into the Amount field) and the rounding rule is set to the nearest $0.05, resulting in the amount of $44.75 cash payment needed, displayed in the Rounded Pymt field. The difference of $0.02 will then post to the Rounding Dept, in this case, Department 16.

This is the Payment Posting Journal to go with the example above:
