Use tank scheduling to schedule deliveries for Divisions by percentage left, route, customer type, delivery type, and tank type, daily use customers, and call in customers. You may also print scheduled deliveries and delivery tickets. There are several route reports that can be printed to assist with scheduling tanks.
Create Tank Schedule File
- From the Route Scheduling Menu, select Schedule Deliveries.
- On the Create Route Scheduling window, press CTRL+C.
- The Create Date defaults with the computer date but can be changed if necessary.
- The Create Time defaults with the computer time but can be changed if necessary.
- The Created By defaults with the User Name but can be changed if necessary.
- Enter a brief Description of the task being scheduled. Ex: Route 101 under 40%.
- Enter a File Name (8 characters, alphanumeric, no spaces) corresponding to the task being scheduled. Ex: RTE101.
- In the Tank Or Meter field, enter T to schedule tanks.
- In the Sort by Sequence Number area, enter Yes to print Route Schedules and Delivery Tickets in order by sequence number assigned on the Tank Info window or No to continue without sorting by sequence number.
- Press CTRL+Q or select Save.
The file is built by division, delivery type, customer type, tank type, percentage left, DD Next delivery, route, scheduled deliveries (Julian), location and can include daily use and call in customers and customers with tanks on hold.

Populate Tank Schedule File
- From the Route Scheduling Menu, select Schedule Deliveries.
- On the Create Route Scheduling window, select the File Name to add customers.
- Select Populate Tank Scheduling.
- On the Route Scheduling Menu window, enter the Division to schedule or press F5 to select the Division from the list.
- Enter the Delivery Type to schedule. Leave 0 for all Delivery Types.
- Enter the Customer Type to schedule. Leave 0 for all Customer Types.
- Enter the Tank Type to schedule in the Tank Type 1, 2, and 3 fields.
- Enter the the Percent Left in the tanks for customers to add to the tank schedule file.
- In the DD Next Delivery field, enter in the number of Degree Days you may want to include. This is for efficiency purposes. If you are routing you will want to catch those tanks coming up for delivery soon.
- In the Tanks Compliant with area, choose from Both Percent and DD Next, Either Percent or DD Next, Percent Only, or DD Only.
- In the Route field, enter the Route to schedule or press F5 to choose from the list. Leave 0 for all routes.
- In the Deliveries Scheduled area, optionally select a range for Julian deliveries.
- Enter the Location to schedule. Leave 0 for all Locations.
- Select Yes to add customers with only a daily use set up in the Tank Info window or No to not add customers with only a daily use set up in the Tank Info window to the tank schedule file.
- Select Yes to add customers that were entered in the Call-In Entry window to the tank schedule file or select No to continue without adding call-in customers to the tank schedule file.
- Select Yes to include customers with tanks on hold.
- Select Process. Select Cancel when the program has finished. This will return you to the Route Scheduling menu.
- Select Schedule Tank Deliveries.
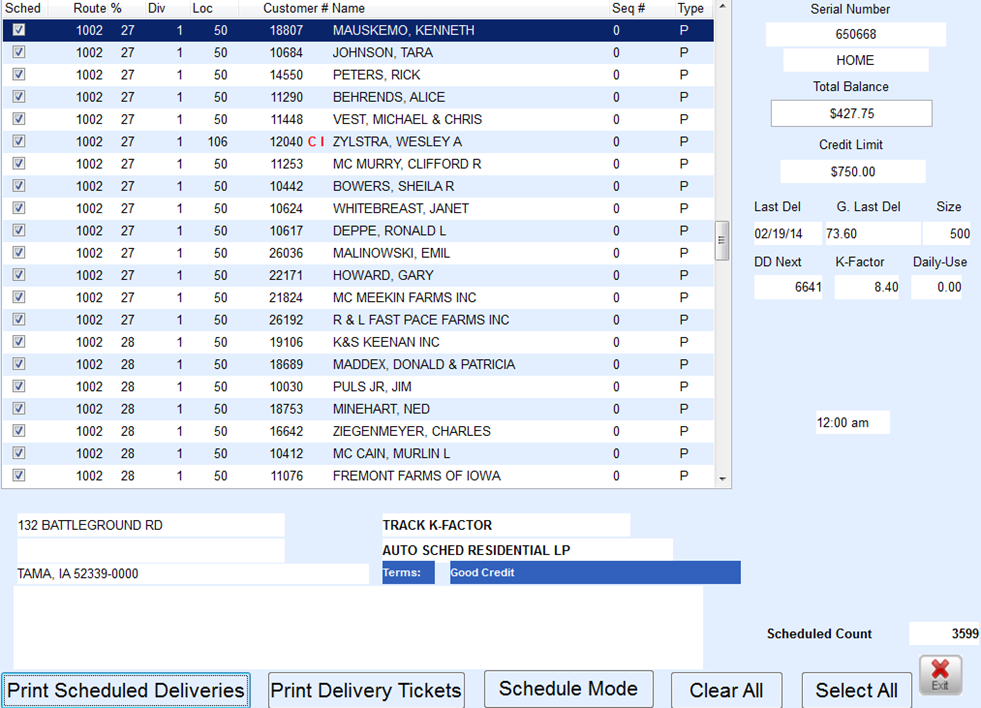

The Browse Tanks Less Than window will display the Tank Serial Number, Total Balance, Credit Limit, Tank Size, Last Delivery Date, K-Factor, Daily Use, Gallons Last Delivered, Delivery Address, Directions, Delivery Type, Hold Information, and Call-In information. Optionally select specific customers for delivery and for whom to print delivery tickets or select all customers in the file.
In the lower right corner of the screen is Schedule Count. This is a total of the customers selected for delivery. Choose Select All or Clear All if needed.
Print Scheduled Deliveries, Print Delivery Tickets, return to Schedule Mode, Clear All selected, or Select All for routing.