- From the Master Menu, select Posting Menu.
- Choose Enter Sales.
- On the Please Select a Sales Journal window, select Create.
- Enter the Division for the Sales Tickets.
- Enter the Date of the tickets delivered.
- Enter the User ID.
- Choose Select.

- On the Sales Journal window, enter the Ticket or Invoice number in the Ticket Number field or press Tab and the system will assign a ticket number.
- The date in the Ticket Date field will default to the date entered in Step 5 but can be changed if necessary. The system does not allow a date after the system date to be entered or a date before the date in the Change Posting Date window.
- Enter the customer number in the Customer Number field. Alternatively, press F5 or select the Search icon to choose from a list.
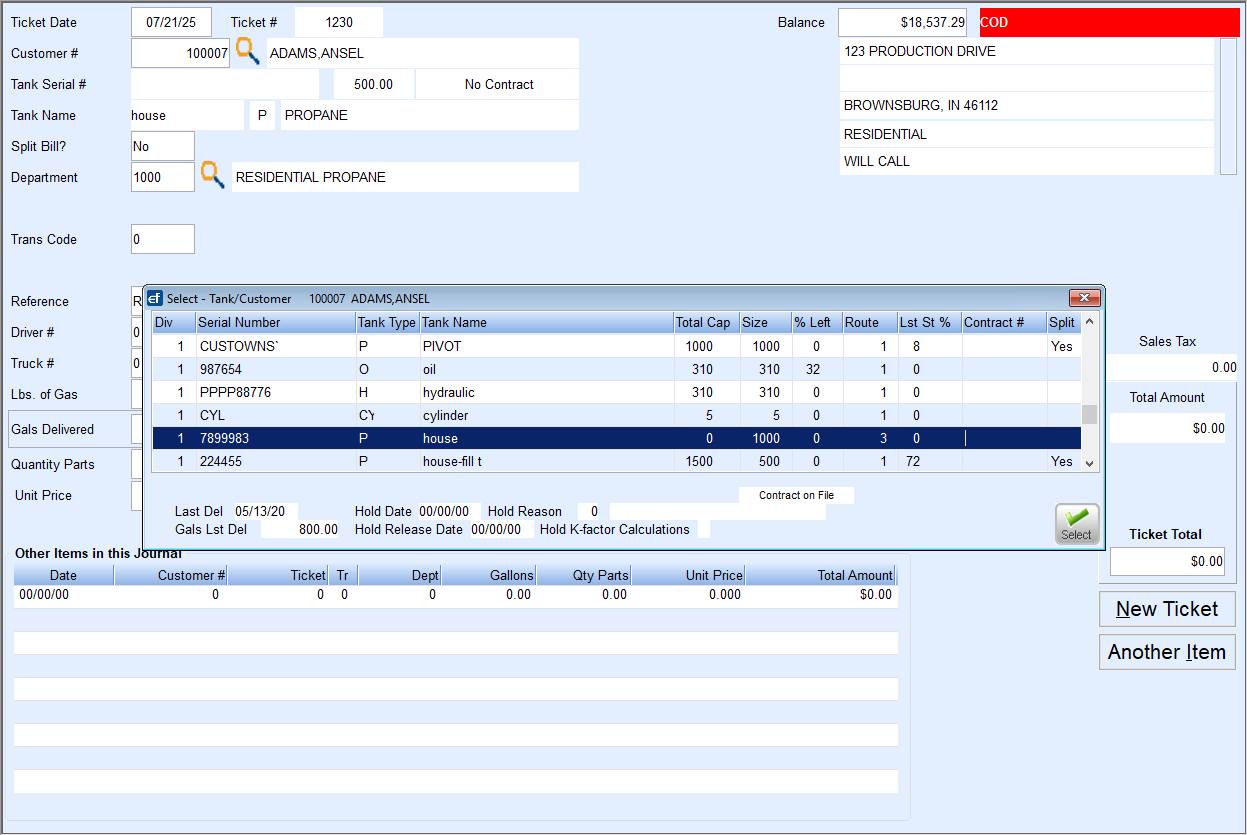
Note: If a customer is inactive, the number will not appear in the list. Entering an inactive customer number will result in an error message. - If a customer has more than one tank, select the tank serial number on the Select - Tank/Customer window and choose Select.
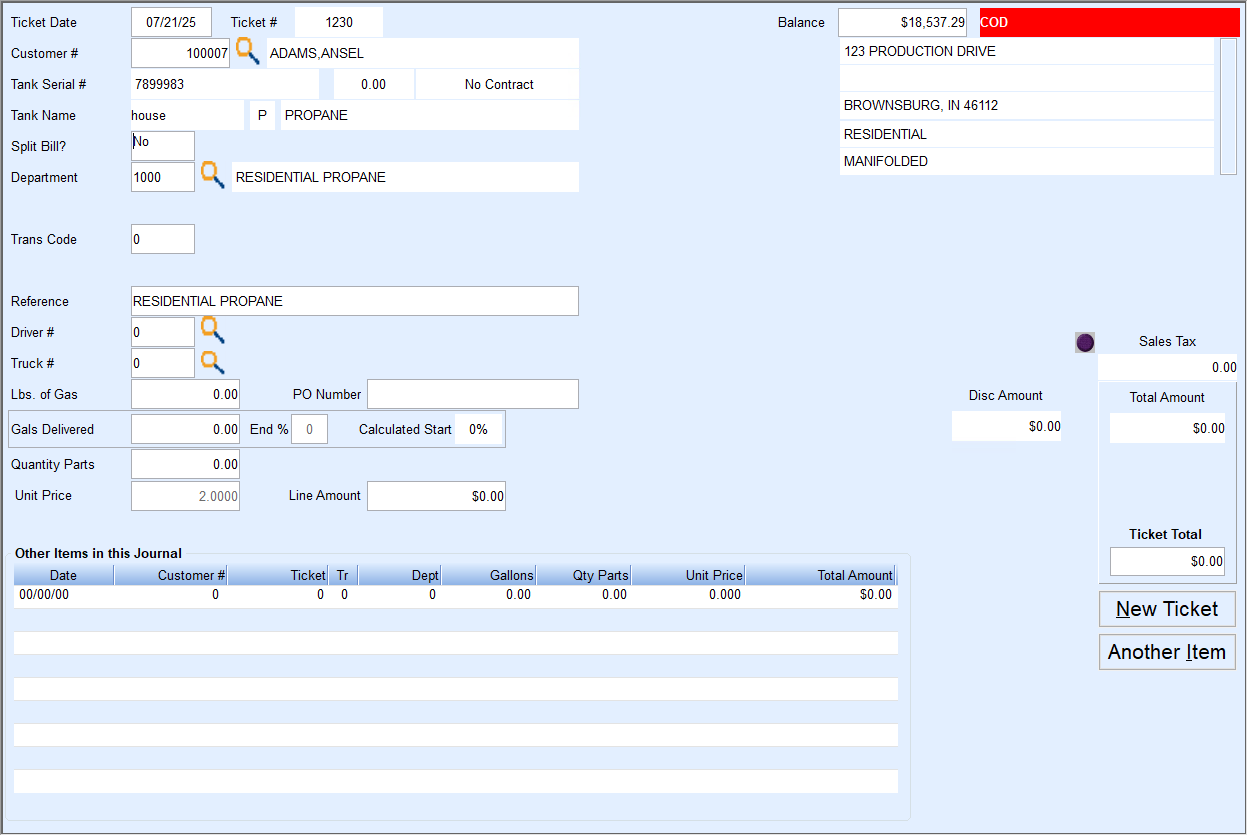
- The default department from the Customer Tank Info window will display in the Department Number field. The department can be changed if necessary. Enter the new department number or press F5 to select the department from the list.
- If the department entered is set to allow discounts, the discount code from Customer Maintenance will display in the Discount Code field. The discount code can be changed if necessary.
- In the Transaction Code field, the default transaction code from the department set up will display.
- In the Reference field, the description for the department number displays. This description prints on statements and displays in the Customer History Inquiry window. Enter a corrected description if necessary.
- In the Driver # field, enter the number that represents the driver who delivered the gas. By entering the driver code, the system will automatically track sales and gallons for the driver reports.
- Choose Truck # that delivered the product. If delivering a non-pumpable product, a truck number will not be required.
- Enter the pounds delivered if applicable to cylinder delivery in the Lbs of Gas field.
- Enter number of gallons the driver delivered in the Gals Delivered field.
- Enter the percentage of the tank after it was filled if desired in the End % field. This information is not required for non Keep Full customers.
- The Calculated Start will automatically be updated based on End %. Enter the percentage of the tank before it was filled if desired. This information is not required for non Keep Full customers.
- Enter the quantity in the Quantity Parts field if gas was not delivered. This field is used for service work, parts, feet of gas line, etc.
- In the Unit Price field, the price from the Price Code on the Tank Info window will display. If the Price Code is not correct, enter the correct price with the decimal point.
- In the Line Amount field, the amount will be calculated from the gallons * unit price.
- If the Division is set to allow regulatory fees and gallons have been entered in the Reg Fee area, the charge from the regulatory code on the Tank Info window will display. If the fee is not correct, enter the correct fee with the decimal point.
- If there is a discount allowed on the sale, the discount amount will display in the Disc Amount field. The discount amount is calculated based on the Discount Code and cannot be changed.
- If the discount is taxable, the calculated sales tax amount based on the tax code(s) on the Tank Info window will display in the Disc Tax field. A breakdown of the tax amount will display above the Disc Tax total. To change the sales tax on the discount, select the Blue Dot next to the Disc Tax, change the tax amount, and select Exit.
- In the Sales Tax Total field, the calculated sales tax amount based on the tax code(s) on the customer Tank Info window displays. A breakdown of the tax code and tax amount will display above the sales tax total.
- In the Total Amount field, the amount is automatically calculated by adding the line amount, Reg Fee, Reg Fee Tax, and Sales Tax Total.
- In the Ticket Total field, the accumulated total of the ticket will display.
- To post additional items to the ticket, select Another Item and repeat Steps 11 - 31.
- If finished with the ticket, select New Ticket and repeat Steps 8 - 31.
Note: A ticket cannot be changed after selecting New Ticket or Another Item. Go to Void Line Item to void the ticket and re-enter the ticket in a new sales journal. To change the ticket before selecting New Ticket or Another Item, press F2 to clear the window and then press ESC start the ticket over. - To print an invoice for the ticket just entered, after selecting New Ticket, choose Print Inv and then select Print on the Print window.
- When done posting tickets, close the Sales Journal window.
- Print or Print Preview the journal and verify that the Sales Journal amount equals the Department Summary amount.


Note: Journals can only be accessed by one user or session at a time. If a second user or session attempts to select a journal that is already open, a message displays stating the user who is already accessing the journal. Also, the full user name will be logged in the Journals Open table instead of just the first 4 characters. This will help with preventing payments from not being included in the master clear PM.dat file.