A statement file must be created before processing, printing, and updating statements. Statements are date sensitive, so it is possible to continue posting into the next month before a statement file has been created.
Create a Statement File
- Go to Master Menu / Month End Menu / Print Statements.
- On the Statement Processing window, press CTRL+C.
- Tab through the Create Date, Create Time, and Created By fields.
- Enter a Description for the statement file being created.
- Enter a unique File Name. The file name can be up to eight alpha/numeric characters.
- Enter the Statement Process As Of Date. This is the date that will be printed on the statements. It also limits the information printed on statements. No posting transactions dated after this date will appear on the statements. This allows posting to continue into the new month before statements have been run.
- Enter the Division to create the statement file for or enter 0 for all Divisions.
- Select All to print all statements, Statement to print regular and payment arrangement statements, or Budget to print only budget statements.
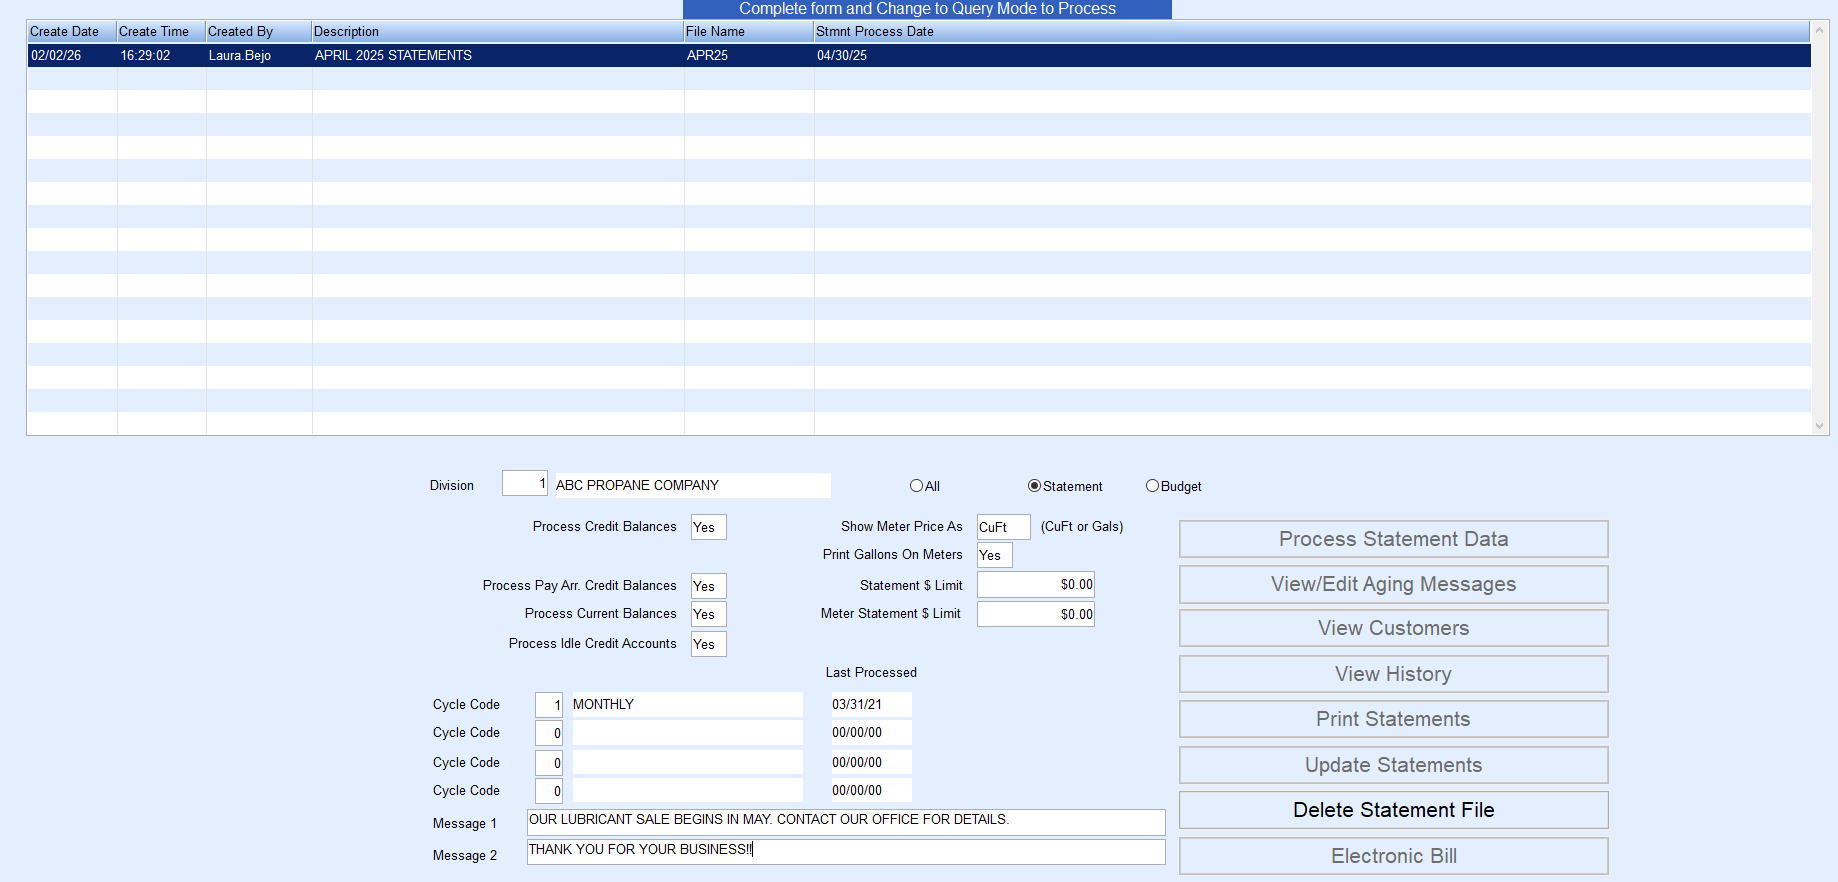
- If All or Statement was selected, enter Y in the Process Credit Balances field to process credit balance customers or N to not process credit balance customers.
- If All or Budget was selected, enter Y in the Process Budget Credit Balances field to process budget customers with a credit balance or N to not process budget customers with a credit balance.
- If All or Statement was selected, enter Y in the Process Pay Arr Credit Balances to process payment arrangement customers with a credit balance or N to not process payment arrangement customers with a credit balance.
- If All or Statement was selected, enter Y in the Process Current Customers field to process customers with a current balance only or N to not process customers with only a current balance.
- If All or Statement was selected and Yes was entered in Step 12, enter Y in the Process Idle Credit Accounts field to process customers with an idle credit. An idle credit account is an account that has a credit balance and has had no new activity since the last statement date. Enter N to not process customers with an idle credit balance.
- If All or Budget was selected, enter the date the budget payment is due in the Budget Due On field.
- In the Show Meter Price As field, enter C to show the price per cubic foot, or type G to show the price per gallon.
- In the Print Gallons on Meters field, enter Y to print gallons for metered customers or N to print metered usage only.
- In the Statement $ Limit, enter the dollar limit under which statements should not be printed. For example, if $5.00 is entered, it will not print statements less than $5.00.
- In the Meter Statement $ Limit, enter the dollar limit under which you do not want meter statements printed.
- In the Cycle Code fields, enter up to four statement Cycle Codes to create the statement file.
- In the Message 1 and Message 2 fields, enter a message to appear on the statements.
- Press CTRL+Q.
- To process statements, select the file to process on the Statement Processing window.
- Choose Process Statement Data.
Note: If the statement file has already been processed, the Process Statement Data button will not be available. - To view customer statements, select View Customers.

Print Statements
- On the Statement Processing window, select the file to print statements.
- Choose Print Statements.
- On the Print Stmnt Menu window, select Alphabetic, Numeric, or Zipcode in the Sort By area. Payment arrangement customers will always print at the end regardless of the Sort By selection.
- In the Statement area, choose Pre-Printed Laser Lex, Pre-Printed Laser Blue, Plain Paper Laser, K & K Pre- Printed, or K & K Pre Print PCL6. Included are samples of the different statements that will print - Budget, Payment Arrangement, and Normal.
- Enter the Begin and End Customer Number range to print.
- Choose Print.
- On the Print window, select Print.
Update Statements
- Select the file to update on the Statement Processing window.
- Choose Update Statements.
- Close the Statement Processing window.
If for any reason there is a need to undo the statement file that has been created and processed, please contact support@energyforce.net.
Change Posting Date
Very Important: Change the Posting Date for a Division on the last day of the month (after statements have been processed and updated). This will prevent changes being made to sales or payments in a previous month which could potentially throw off Accounts Receivable balances. This information is updated at Supervisor / Set Up Options Menu.
