The Add and Adjust Inventory is designed to distribute Non-Serialized Inventory items to several locations at one time rather than having to perform multiple transfers. An example of this type of transfer would take place after a Purchase Order has been received to a shipping location and needs distributed to multiple warehouse locations.
Additionally, if quantity values are incorrect or have somehow gotten out of sync with actual values, adjustments can be made.
Inventory Distribution
- From the EnergyService menu go to Inventory / Add & Adjust Inventory.
- Press Ctrl+C to create an inventory adjustment.
- Press F5 in the Inventory Seq field and select the inventory item to be distributed.
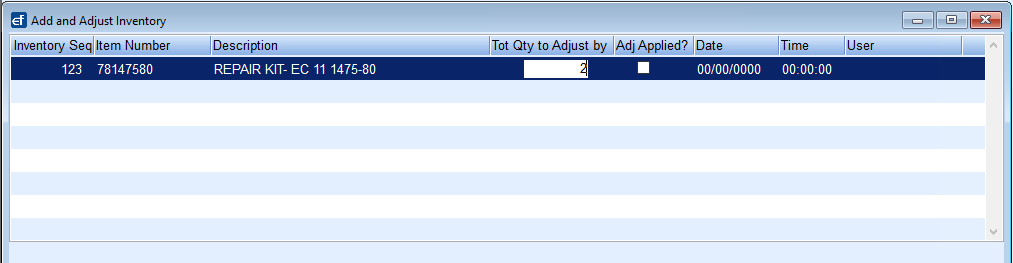
- Enter the Tot Qty to Adjust by.
- Press F5 to select the first receiving storage location.
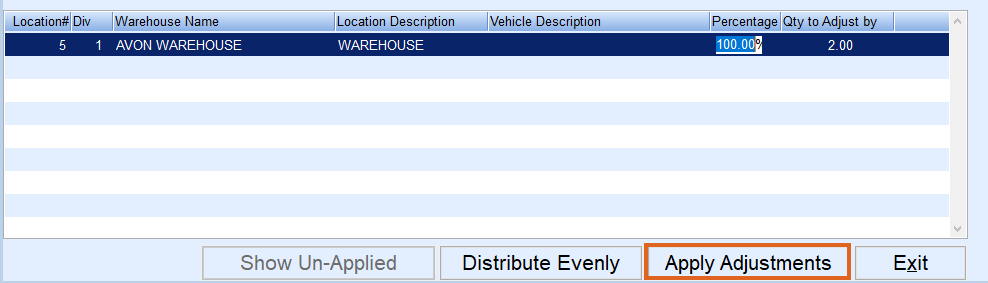
Note: If the Qty to Adjust by is to be distributed to all Storage Locations, select Distribute Evenly at the bottom the screen and the system will automatically input all storage locations and the Qty to Adjust by will automatically update. - Enter the quantity the storage location is to receive. The % field will automatically update.
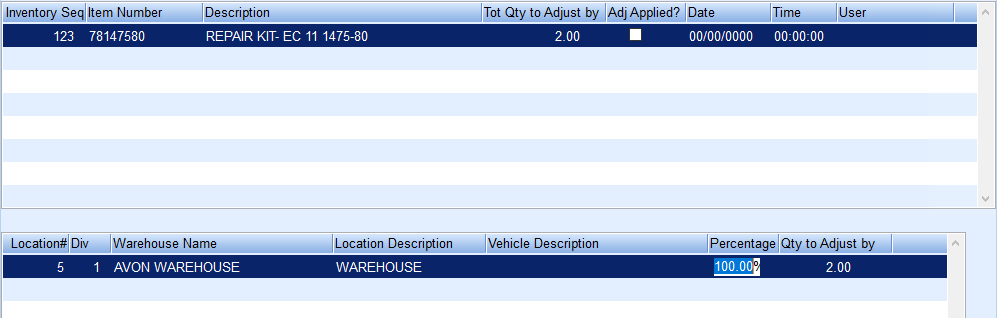
- To add additional receiving locations, press the Down Arrow to add a new line and press F5 in the Location field. Repeat until all locations are present.
- Once the Qty to Adjust by is equal to the Tot Qty to Adjust by, select Apply Adjustments.
- The system will automatically apply the adjustments and remove the entry from the screen.
Note: Inventory Distributions do not record to the inventory transfer audit tables. - Navigate to the Warehouse Locations menu and verify the items updated properly.


Inventory Quantity Adjustments
EnergyService offers the ability to electronically update inventory quantities by using the Inventory Utility menu.
Within this menu, the current inventory can be exported to an Excel spreadsheet. This spreadsheet can be updated with the current inventory numbers and then reimported into Energy Force.
Export Inventory
- From the EnergyService Main Menu, go to Supervisor / Utility.
- Select Export Inventory.
- Enter the warehouse Divisions numbers to export.
- Select to export All, Serialized, or Non-Serialized and choose Process.
- The system will export an inventory file to the \\servername\CTLS93\DD85\CSV folder. The file will also open automatically in Excel.

- Within this spreadsheet, update Storage Loc Quantity on Hand (Column 18) with the most up-to-date quantity on hand.
- Once completed, go to File / Save As and rename it InvenImport.CSV.

Import Inventory Quantities
Once the items listed within the inventory spreadsheet are updated and copied back into the CSV folder, use the Import Inventory Quantities utility.
Select Import Inventory Quantities. The program will automatically import the spreadsheet back into the system and will advise of the number of records updated.